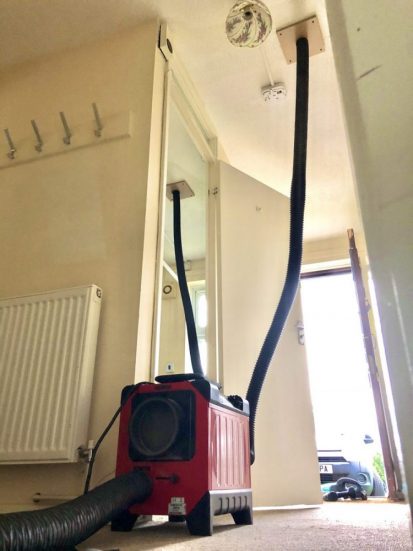
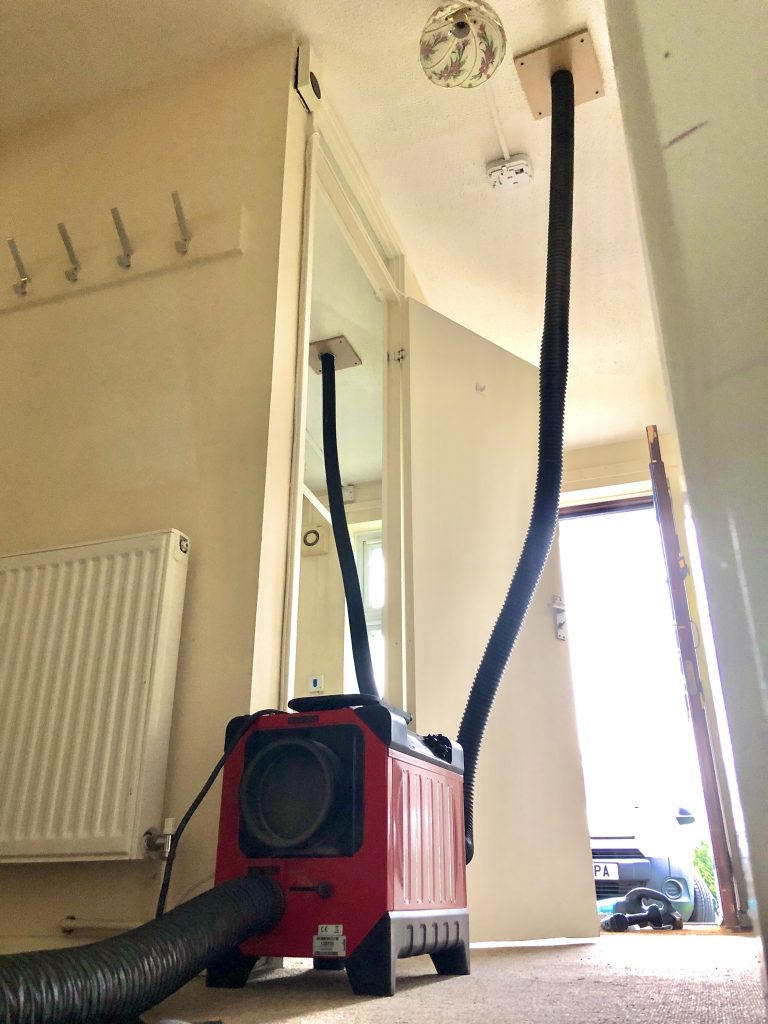
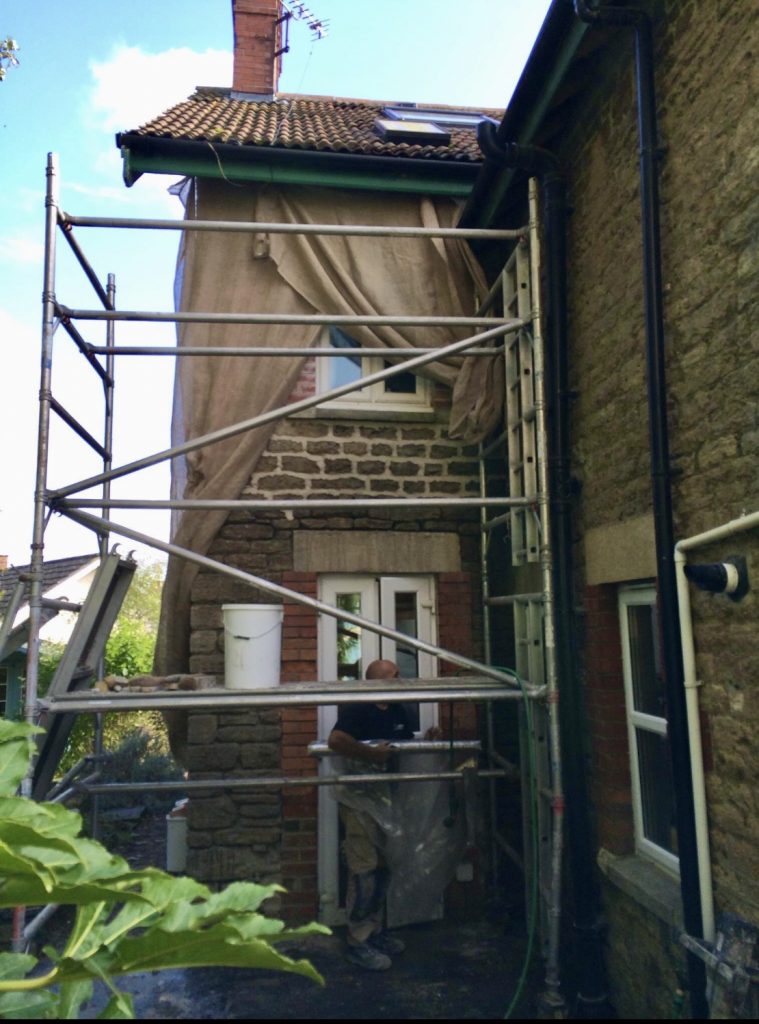
A leak was noted to be coming through the ceiling of the flat above, and luckily most of the water could be drained into the wet room without damaging the floor coverings in the property.
I drained the ceiling of excess water, and then started the drying of the property. By using the Corroventa desiccant dehumidifier I could target dry the ceilings and above flooring without that much disruption. By getting the drying equipment installed within a couple of hours this then eliminated any secondary damage of mould occurring. If you need help with drying a building from a flood or leak, trace and locate, trace and access, or leak detection give us a shout.
It is part of Building Research Establishment (BRE) digests on authoritative summaries of state of the art on specific topics in construction design and technology. They draw on BRE’s expertise in these areas and provide essential support for all involved in design, specification, construction and maintenance. This particular document can be purchased direct from BRE for just £15.00 here https://www.brebookshop.com/details.jsp?id=287528
This Digest considers the causes of dampness in walls and offers a positive method for diagnosis of rising damp. It suggests possible remedial measures that can be taken to avoid rising damp such as providing a complete moisture barrier by insertion of a physical damp-proof course or the non-traditional method of chemical injection. The repair of plaster damaged by damp is also discussed.
Mechanism of rising damp
For water to rise in a wall, a supply must be available at the base. If the ground surrounding the wall is saturated, this condition is achieved, but if the ground is not saturated the soil will exert a suction that will oppose the upward capillary pull on the water in the wall. This suction is approximately equivalent to the negative pressure exerted by a column of water extending from the base of the wall to the water table. If the water table falls, the height of the moisture in the wall will drop to a new level provided there is sufficient time for equilibrium to become established. Each period of heavy rain on the ground at the base of the wall will produce a temporary condition of saturation and the water level in the wall will begin to rise again.
The level to which it rises depends on two factors: the amount of evaporation of water from a wet wall and on the resistance to the flow of moisture up the wall. If this resistance is high (as in a material with many fine pores), the effect of evaporation is most marked reducing the appearance of rising damp, but if the wall material has many coarse pores, the height of dampness will be only slightly affected by normal rates of evaporation.
Increasing the heat input to the structure will increase the rate of evaporation from the wall surfaces. The overall effect is to increase the rate of flow of water up the wall but because of the resistance to flow this is likely to be accompanied by a reduction in the height to which the moisture extends.
In addition, evaporation will occur from deep in the pores of the plaster so that the rising damp seems to disappear. In summer, hot weather will increase the evaporation rate and lower the water table so the effect of reducing the appearance of the rising damp can be even more striking.
Water drawn from the soil usually contains a low concentration of soluble salts and the rising water will also dissolve salts present in the bricks or the mortar. When evaporation occurs the salt solution becomes more concentrated at the surface and eventually the salts will crystallise out. This tends to block the pores, reducing evaporation and hence raises the level of dampness. These salts may also be hygroscopic and will absorb moisture from the air above some critical value of relative humidity so that the surface becomes wet during wet weather, although this dampness disappears when the air becomes drier again.
All this suggests that under real, dynamic conditions rising damp in a wall is often in a rather sensitive equilibrium which may be considerably disturbed by changes in the heating of the building and in the level of the water table. The presence of hygroscopic salts tends to obscure any drying associated with such changes by keeping the wall more moist than it would otherwise be. If such salts are removed from the surface by removing the old plaster, and the heating system is improved, it is likely that the apparent dramatic improvement in the appearance of the wall surface will give the impression that the rising damp has been cured when this is not actually the case. It is against this background that the correct diagnosis of rising damp becomes important.
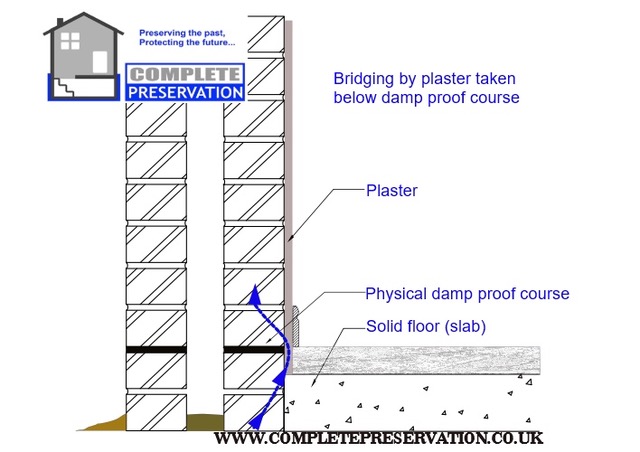
BRE DIGEST 245 is the only way to offer quantitative moisture analysis to prove if a wall has rising damp. This is well documented in the British Standard, BS 6576, BS 5250. BRE digest 245 clearly shows multiple pictures of possible causes of rising damp where there is a physical damp proof course installed that has been bridged by one way or another.
The above image shows rising damp being caused by the damp proof course being bridged by the plaster
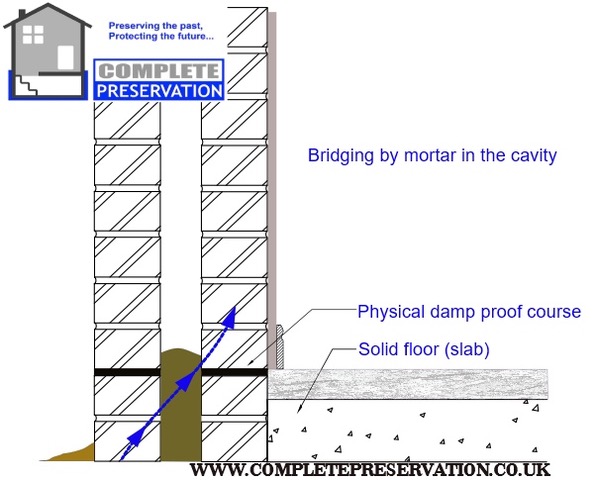
The above image shows rising damp being caused by the damp proof course being bridged by mortar in the cavity.
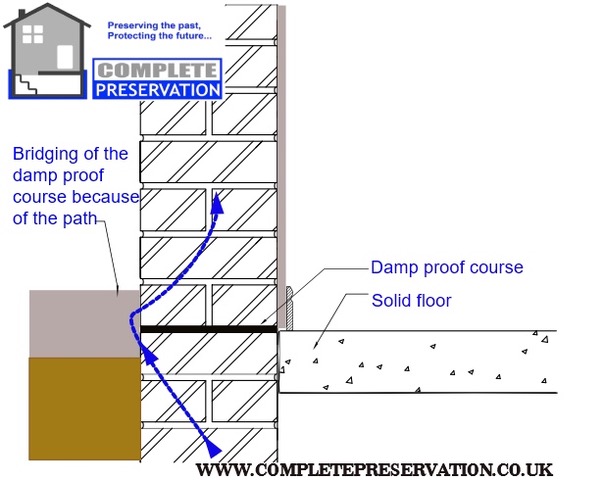
The above image shows rising damp being caused by the damp proof course being bridged by the path or just high ground levels
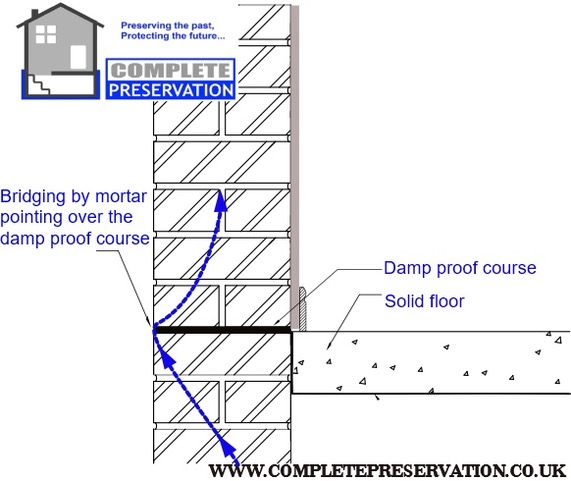
The above image shows rising damp being caused by the damp proof course being bridged by pointing over the damp proof course
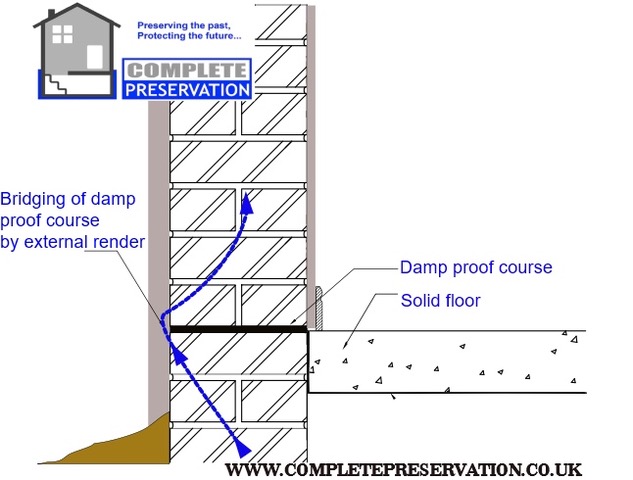
The above image shows rising damp being caused by the damp proof course being bridged by the external render
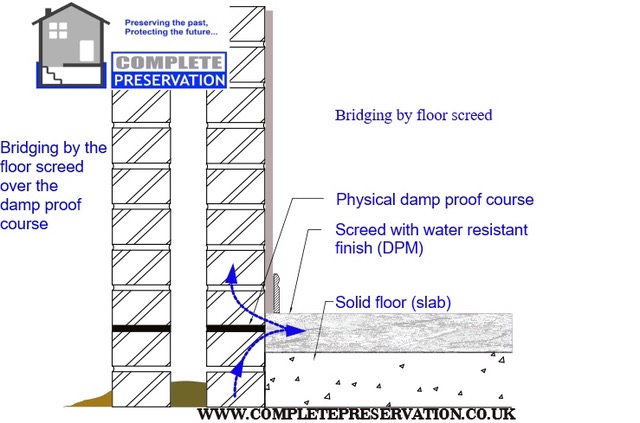
The above image shows rising damp being caused by the damp proof course being bridged by the floor screed
Obviously solid wall properties built before a physical damp proof courses were installed can still have similar causes like high ground levels, modern renders rendered to the floor etc, that can cause rising damp issues. Many older properties also had land drainage incorporated around the property which were installed if an area was deemed to be very wet, which is discussed BRE DIGEST 245. I’ve personally noted this on many of the older historic local buildings I have worked on in the area. This is an extract from my local Bye-laws of the in Warminster Local Board from 1858. Drainage of subsoil and prevention of damp. The house drainage shall be constructed, either with additional eathernware pipe drains or otherwise, as to drain the subsoil of the premises, whenever the dampness of the site appears to the Board to render this necessary; and all the rain-water shall be so drained or conveyed from the roofs of the buildings as to prevent its dripping on to the ground and causing dampness in the walls.
In addition, evaporation will occur from deep in the pores of the plaster so that the rising damp seems to disappear. In summer, hot weather will increase the evaporation rate and lower the water table so the effect of reducing the appearance of the rising damp can be even more striking.
Water drawn from the soil usually contains a low concentration of soluble salts and the rising water will also dissolve salts present in the bricks or the mortar. When evaporation occurs the salt solution becomes more concentrated at the surface and eventually the salts will crystallise out. This tends to block the pores, reducing evaporation and hence raises the level of dampness. These salts may also be hygroscopic and will absorb moisture from the air above some critical value of relative humidity so that the surface becomes wet during wet weather, although this dampness disappears when the air becomes drier again.
All this suggests that under real, dynamic conditions rising damp in a wall is often in a rather sensitive equilibrium which may be considerably disturbed by changes in the heating of the building and in the level of the water table. The presence of hygroscopic salts tends to obscure any drying associated with such changes by keeping the wall more moist than it would otherwise be. If such salts are removed from the surface by removing the old plaster, and the heating system is improved, it is likely that the apparent dramatic improvement in the appearance of the wall surface will give the impression that the rising damp has been cured when this is not actually the case. It is against this background that the correct diagnosis of rising damp becomes important
Experience has shown that it is much more difficult to diagnose the source of dampness in a wall than is generally supposed. It is particularly difficult where the presence of some soluble salts greatly complicates the situation, especially when just a damp meter is being used.
BRE DIGEST 245 is guidance on the diagnosis of rising damp on a rational basis. The basis of the method proposed is to to drill samples, from the wall and measure the free water value and hygroscopic value of the said samples. The aim is to establish whether any dampness damage is caused by rising damp as opposed to other processes, then a location away from other sources like drains, gutter leaks etc. If visible damp or high damp meter readings are located on external and internal walls, ideally many samples should be taken as multiple causes could be causing the symptoms.
Once all of the laboratory analysis is finalised, then we can produce a graph detailing the moisture, and this will help determine the damp issue.
Whilst gravimetric sampling is far superior than using a carbide meter/speedy meter, it is imperative that the guidance in BS: 6576 is used to eliminate other potential causes. An example being that perhaps gravimetrics have proved that rising damp is a cause of the decorative internal spoiling, which is the actual sympton of rising damp. The actual cause of the rising damp could still be something like damaged below ground drainage that would need to subjected to a CCTV drain survey. Gravimetrics and hygroscopic salt analysis sometimes points to there being no nitrates or chlorides present, which then points to drain issues or leaks within the property. This means that finding the root cause, and drying of the building is all that is needed, rather than removing all of the plaster and getting it replaced.
Whilst it sometimes might sound like a slow process and unduly complicated, but no simpler procedure has proved to be reliable.
Some damp issues can cost a small fortune to fix, and so can the amount of errors in damp diagnosis by damp experts. This is why it is imperative that the diagnosis is correct first time.
If you need advice regarding damp issues, give us a shout.
I was recently contacted by a landlord to dry down a property after a leak on a new build property. There have been 2 previous plumbers that had been instructed to find the leak and rectify it. I was of the understanding they had carried out what they had been paid to do. When I visited the property to install our Corroventa drying equipment, it was obvious to me there must still be a leak as I could see water droplets on the ceiling. The ceiling seemed in pretty good condition with the possibility of being saved. I wanted to do the least amount of damage possible to keep the cost of the repairs down. By using my Sewerin leak detection equipment I found the leak, as I could hear the dripping noise ever so slightly. This isn’t something you could hear without the acoustic listening equipment. And by using a Ridgid snake camera I could actually see the leak, and dripping of the water in the ceiling void.
The leak was on the cold feed to the sink on the push fit connection.
The leak was fixed and drying equipment installed. The Corroventa drying equipment is controlled by SuperVision, which also offers real time data logging. This equipment is worth it’s weight in gold during the hot weather as I could turn off the system if it became too hot in the property, or the tennant wanted it switched off at night. I also set high threshold alarms to alert me of high temperatures within the property.
If you have a leak or a damp issues give us a shout.
This is a property I have previously surveyed last year, where there were issues with penetrating damp. We found external issues with rainwater goods, peeling modern paint, rotten timber lintels etc. We removed the modern masonry paint using our Thermatech super heated hot water system, repointed in lime, lime rendered the rear wall, and the client carried out the lime wash finish. We also removed and repealed the lintels. This year it was about getting the rising damp source identified, and some form of sympathetic damp repair. This video is a classic example of you get what you pay for, in regards to damp surveys. We don’t offer free damp surveys because we offer professional surveys, and reports. If you need to find the source of rising damp, penetrating damp, or condensation give us a shout. We offer quantitative damp diagnosis following the methodology in BRE DIGEST 245.
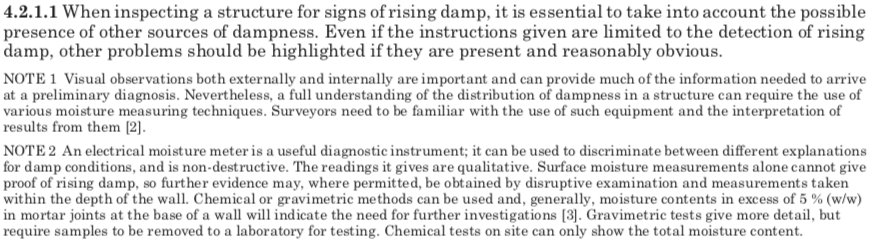
This property has been suffering from damp issues for a number of years, and it hasn’t been diagnosed correctly. I was told there were a few suggestions as of why it was thought to be damp, but we have found the cause now. Before you even think about damp proofing a building, it is about elimination before coming to a conclusion. I’ve seen many a times when a damp survey Company have carried out a damp survey, and haven’t eliminated anything in regards to potential causes of rising damp. In this case, this is a classic example of an obvious cause of rising damp, but unfortunately for some people who have paid for a damp survey there is no drain inspection carried out. Now i’m not saying that every property should have a drain survey, but there is British Standards in regards to damp surveys that actually mention this, especially if you have damp internally adjacent a drain. See below from British Standard BS 6576 4.2.1.3 d)
So the question is why doesn’t this get inspected? In my opinion if you ask any surveyor whether the firm is independent or not they will probably not offer a drain survey as this isn’t a piece of equipment they actually have. So it’s unlikely at enquiry stage they would want to lose out on a survey. To be fair though, any prior conversation the surveyor might have had with the client, they might think that from your observations the damp might be more condensation related, and this is reasonable. A decent CCTV drain inspection camera will cost around £5000.00 / £6000.00, plus you will need jetting equipment, and cleaning equipment along with sonde detection. All of this is likely to cost around £15000.00, plus a van to carry it in. You can now see exactly why a general surveyor wouldn’t offer this service.
We have heavily invested in our surveying equipment to ensure we get the diagnosis right first time. If you need a CCTV drain survey along with quantitative moisture analysis following BRE DIGEST 245, please contact us to discuss your issues.
The video below shows the cause of the rising damp. This was caused when the tarmac path was installed over 30 years ago, and damaged the drains.
When trying to assertain the cause of any potential rising damp issues, it is imperative that all possible causes are identified and eliminated before coming to a conclusion. A common cause of rising damp issues can be because of surface drainage problems, high ground levels, and even blocked and damaged drains. Drains are something that are rarely investigated in regards to causing rising damp issues by damp surveyors, this is because of the cost of the drain CCTV equipment compared to damp meters etc. The below British Standard BS 6576:2005 (Code of practice for diagnosis of rising damp in walls of buildings and installation of chemical damp – proof courses) states what you should be eliminating before coming to a conclusion with regards to the diagnosis of rising damp.
The below screenshot from British Standard BS 6576:2005 section 4.2.1.3 d, states particular attention should be paid to faulty drains. Have you had your drains checked as part of your damp survey?
One piece of equipment that we use to identify drain defects is our CCTV drain camera inspection kit, along with our drain jetting, and cleaning equipment. This takes a damp survey to another level, and using this equipment along with our other damp surveying equipment it gives us complete confidence that we can solve any damp issue.
I have seen many rising damp issues having the symptoms treated, rather than finding the actual cause.
If you have damp stains at the base of the wall, you would benefit from a drain survey along with quantitative gravimetric moisture analysis following the BRE DIGEST 245, as per the below screenshot of the British Standard BS 6576:2005 (Code of practice for diagnosis of rising damp in walls of buildings and installation of chemical damp – proof courses). See 4.2.1.1 note 2.
Obviously we don’t offer free damp surveys. What we offer is a damp survey that will eliminate issues to give the client the correct advice. With this advice we can then offer repairs in regards to the defects identified.
It is presumed by the way of the self proclaimed damp experts that the calcium carbide meter, or also referred to as the speedy meter, is in fact the most reliable form of moisture measurement when it comes to identification of rising damp. Unfortunately most don’t really understand the limitations of the damp measuring instruments, and don’t follow the guidance as per BRE DG245, where part of the sample should be put aside for the hygroscopicity determination.
I own, and have used a calcium carbide meter on many occasions, and in my opinion when measuring moisture, when there is the potential for rising damp and hygroscopic salts this instrument can be massively misleading. I personally only use this when inspecting flood damaged buildings that are more of a modern construction that would unlikely to be contaminated from hygroscopic salts, from a genuine long term rising damp. The reason for this is because you can’t determine what is actually going on regarding the amount of moisture, and giving the correct advice to fix the issues.
Example explanations
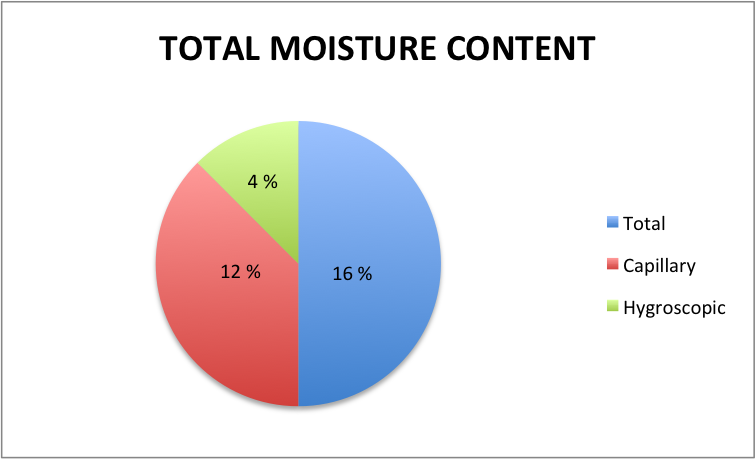
The below picture shows the total moisture content of a calcium carbide meter reading of a sample removed from the wall, and placed inside the speedy meter. As you can see it gives a total moisture content of 16 %. The total moisture content (16 %), is made up of the capillary moisture, and the hygroscopic moisture. The speedy meter doesn’t give a figure for these separate amounts, which is the misleading part.
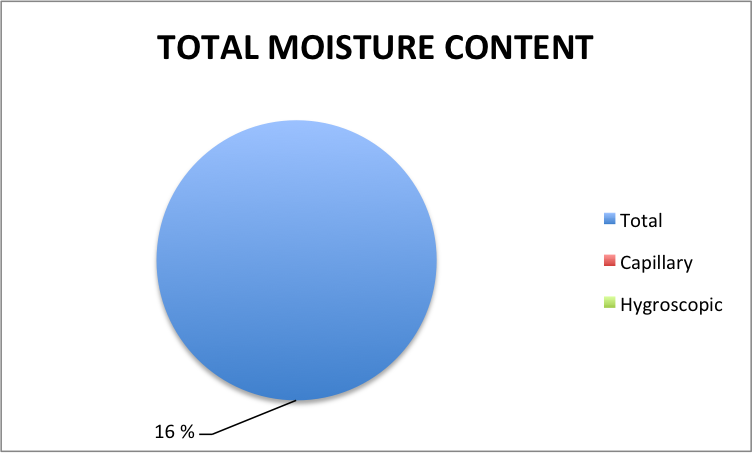
The below picture shows an example of the total moisture content broken down into the capillary moisture, and the hygroscopic moisture.
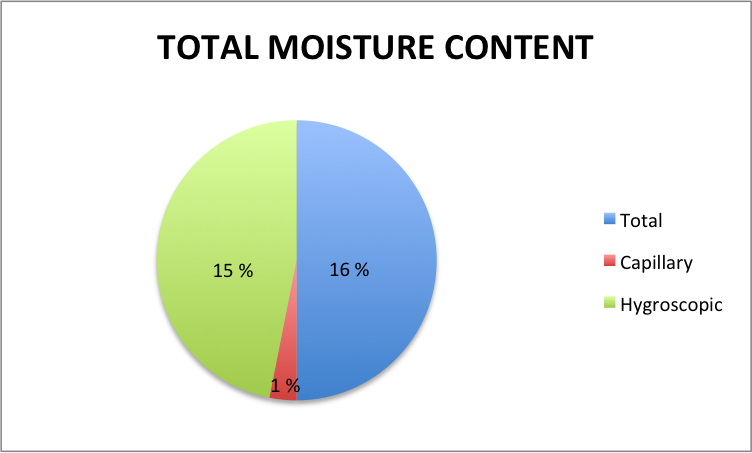
The below picture shows the same total moisture content as in the above picture, with a capillary moisture content of 1 %, and a hygroscopic moisture content of 15 %….. completely different.
The above images explain the total moisture content, and show that it is impossible for interpreting different moisture content results, without understanding the capillary moisture content, and hygroscopic moisture content on site.
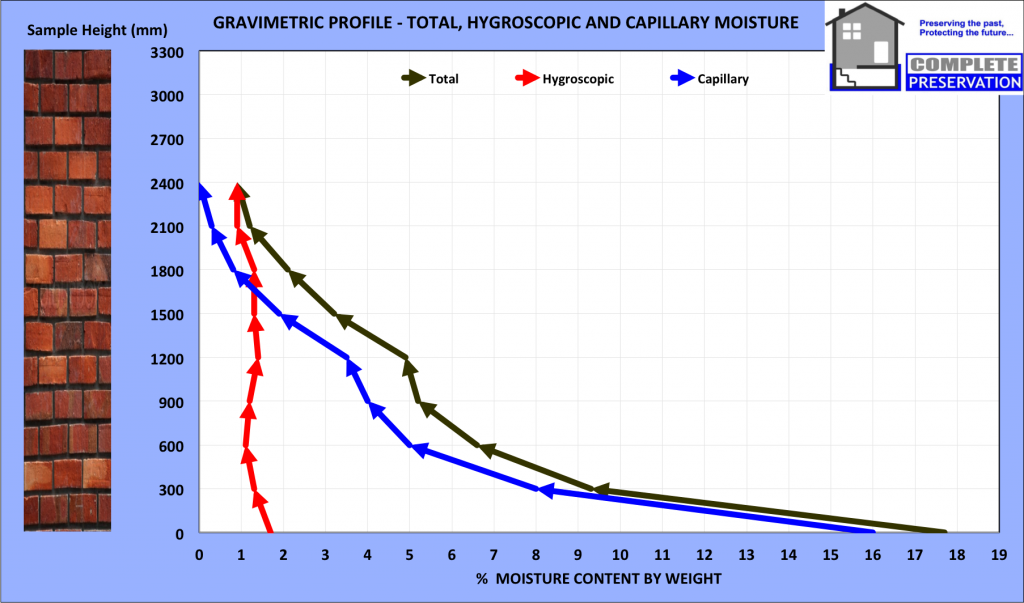
Lets now look at another example with some more guidance of why it is so important to differentiate between capillary moisture and hygroscopic moisture. This is from one of my recent surveys where a traditional solid wall property with no physical damp proof course installed has been damp proofed because it was presumed the property had genuine rising damp and needed a new damp proof course. During this survey I removed samples of plaster/mortar for analysis, and worked out the exact amounts of moisture using the gravimetric laboratory methodology. You can see in my graph below the total moisture content has been split up, to include the capillary and hygroscopic moisture content.
What does this graph show? This is the most important part…. what it shows here, is that there is a very high amount of capillary moisture content, and a low level of hygroscopic moisture content. This is not what you would see on a genuine long term rising damp issue, as you would normally see more of a distinguished hygroscopic salt band. This property actually had issues with drains that I picked up with our CCTV drain survey. The samples were also chemically tested for nitrates and chlorides (hygroscopic salts), and none of any significance were present. All of the data points to drainage issues or possible leaks, and this couldn’t be observed from an onsite calcium carbide meter test. This property needs to be dried down with a Corroventa desiccant tented drying equipment, and the drain issues rectified.
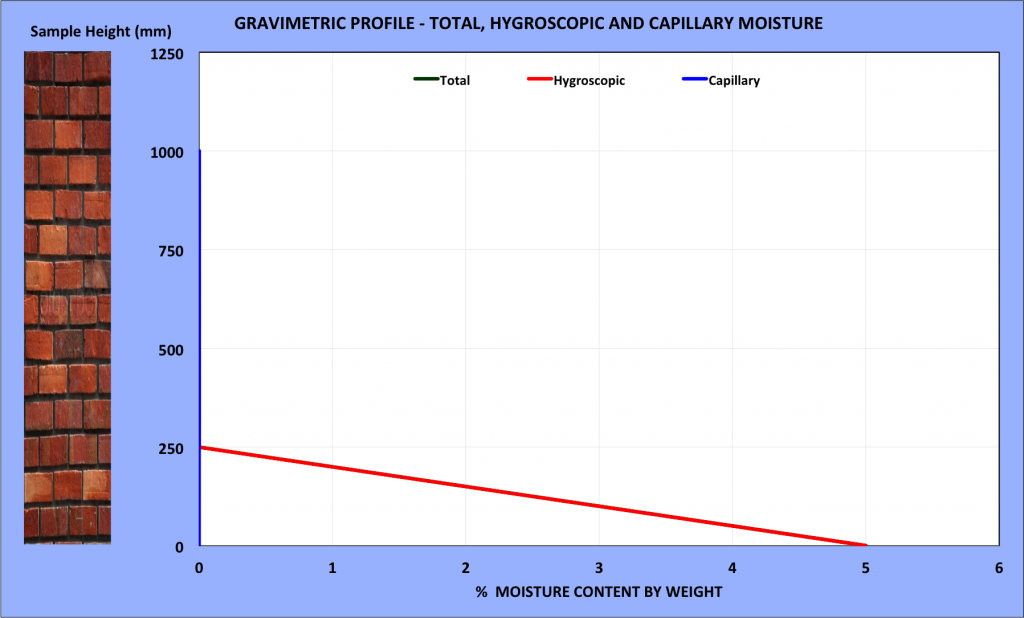
The below graph is something I see often where a physical damp proof course has been installed from new when a property was originally built. The total moisture content is 5%, and so is the hygroscopic moisture content, and the capillary moisture content is 0 %. How could you give suitable advice to your client if you couldn’t differentiate these moisture contents?
What this actually shows is that there is no capillary moisture. Capillary moisture content, is only present if there is a source of water/free moisture such as rising dampness. The amount of capillary moisture content will depend on the permeability, porosity and severity of the water ingress. The absence of capillary moisture indicates that a material is ‘dry’, that is not subject to water ingress from any source. This means normally that the damp proof course is most likely to be bridged, by plaster, debris in the cavity, or perhaps the floor screed. By also chemically testing the mortar samples for nitrates and chlorides, we can prove if these are present. If these are present as in this case, the repair was to remove the bridging issue, along with a suitable plaster repair.
Capillary moisture /Free moisture
The second component is the free moisture content which is only present if there is a source of water ingress such as rain penetration, rising dampness. The amount of free moisture will depend on the permeability, porosity and severity of the water ingress. The absence of free moisture indicates that a material is ‘dry’, that is not subject to water ingress from any source.
Ground water salts: Not only is the distribution of moisture required, we also need to obtain details of past activity of rising dampness, and this can be obtained from the presence and distribution of ground water salts, basically chlorides and nitrates. Where a long term rising damp complex has existed, these salts will always mark the maximum height to which water has risen, and tend to form a concentration (‘salt band’) around the maximum height of rise. I often find on very old properties that have been subjected to long term rising damp over many years, sometimes two distinguished salt bands. Thus, even if water ceases to rise the salts will still remain and ‘mark’ the maximum height once reached. It is the relationship between the distribution of moisture and salts that is the basis of the investigation.
The information regarding speedy meter testing of moisture and gravimetrics has been published and documented by Building Research Establishment (BRE) for many years. The earliest copy I have is the TIL 29 version which was revised in April 1977, and the latest version is BRE DIGEST 245, also known as BRE DG 245. The latest version of this document is from 2007.
Very important extract below from DG 245 2007 edition
Experience has shown that some building materials possess an HMC of up to 5% even without the introduction of salts from external sources. Although only a rough indicator, the 5% threshold does represent a reasonable general guide to whether or not some kind of remedial treatment is needed. This emphasises the importance of the difference between the HMC and MC measured on samples. It can also be useful to establish the MC and HMC of wallpaper, plaster and render, although drying plaster above 35 °C will drive off hydration water bound within the plaster and must be avoided. The figure of 5% at the base of the wall (the wall/floor junction) can be taken as an approximate guide to the presence of rising damp. However, even at this low level of moisture there can be a risk of damage to finishes and rot to any timber that may be in contact with the wall.
If you like this kind of geeky facts on damp, you might like this one that has some screen shots from the British Standards www.completepreservation.co.uk/rising-damp/http://www.completepreservation.co.uk/rising-damp/
You’ve obviously been given some information from perhaps a Chartered Surveyor that has carried a Homebuyers survey, or perhaps another kind of building survey, and are seeking advice from the internet. Well hopefully this will give you an idea of what is needed to help stop/control the rising damp issues you have.
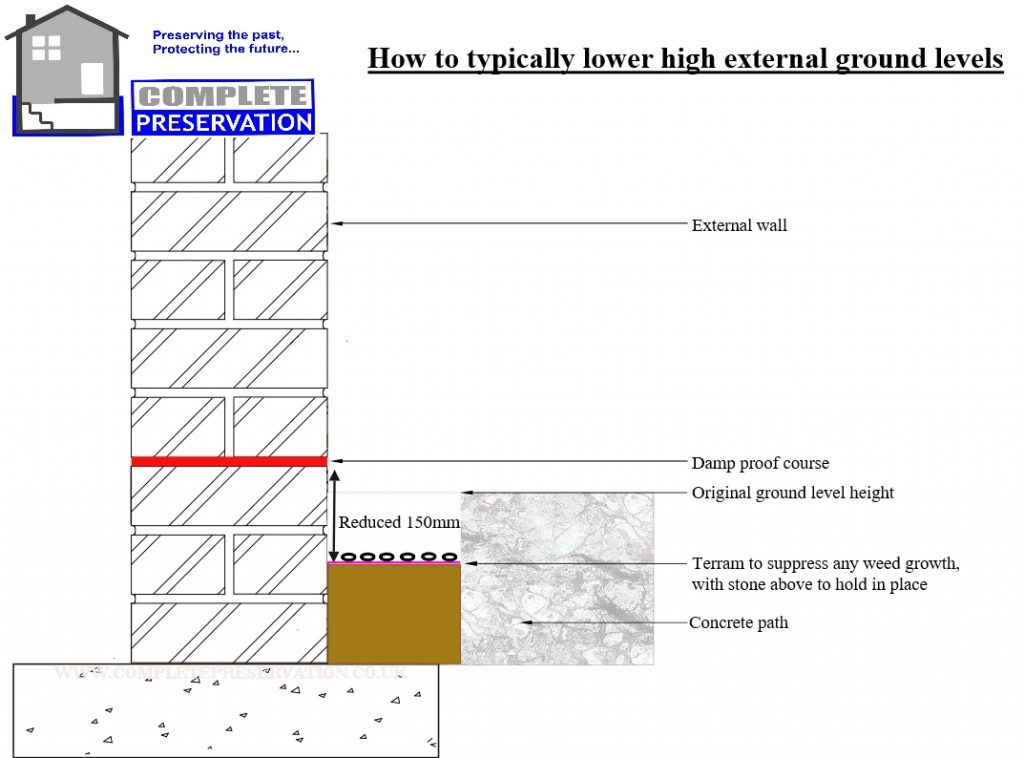
Ideally external ground levels where possible should be lower than the damp proof course (dpc) by around 150mm / 6″). This will help to prevent rainwater splashing over the dpc (damp proof course), especially when there is heavy wind driven rain. If a damp poof course isn’t present it will also still help keep the base of the wall dry, so is still necessary. By lowering the ground levels to beneath the damp proof course, this can also stop bridging of the damp proof course, ensuring that the damp proof course performs as to be expected (to stop rising damp). Also by lowering the external ground levels you will also control the height of rise, of any rising damp. This will create evaporation at the base of the wall at lower level, as you’ve simply stopped giving the rising damp moisture to gain in height. Obviously the height of rise depends on many things but basic things like how wet the ground is, and the suction from the wall. But nonetheless this will massively help the issue, and sometimes completely solve/control the rising damp issue.
A common problem I often come across is that by lowering the ground levels doesn’t fix the issue. What I mean by this is the perception of that there is still a problem visibly internally to the plaster as it looks like it’s damp still. This occurs because the damp patch isn’t damp because of capillary moisture (rising damp) any more, it’s still damp because hygroscopic salts like nitrates and chlorides (hygroscopic moisture) are present in the plaster, and are absorbing moisture from the internal atmosphere. Sometimes you can also get the appearance that it is dry one day, perhaps on a warm sunny day in the summer when the humidity is lower, or it appears again when its humid, because the damp becomes more visible when the humidity is higher because it is hygroscopic. If this is the case the wall would have been contaminated by hygroscopic salts for a considerable time previously. One way to eliminate this is to take plaster/mortar samples following the guidance in BRE DIGEST 245, as this is the only quantitative way to differentiate between hygroscopic and capillary moisture. This is a service we offer to all of our clients as part of our damp consultancy service.
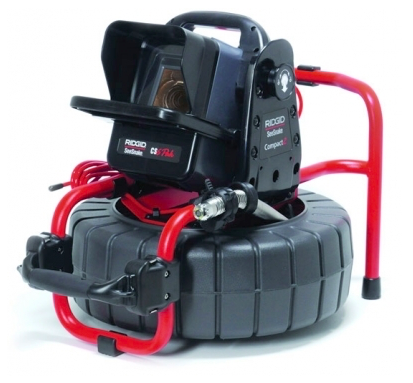
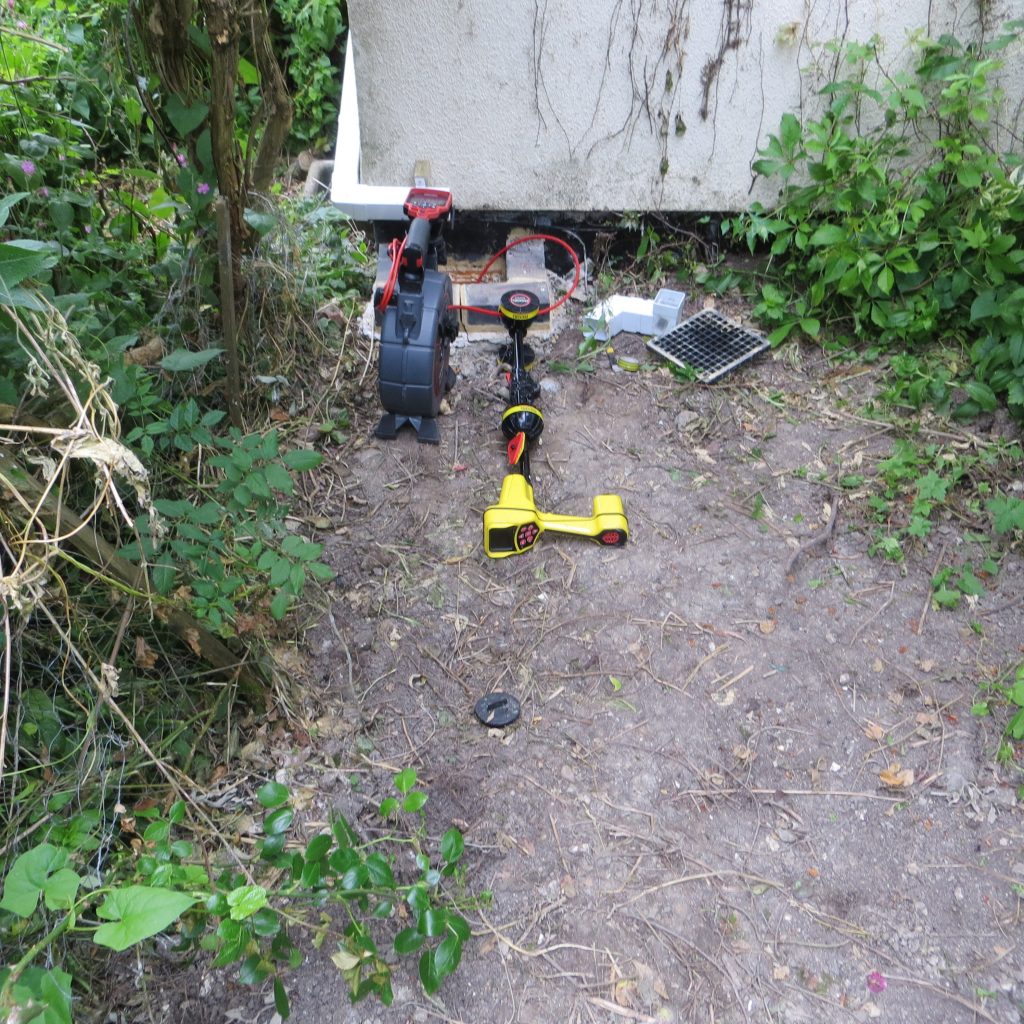
Again often people have been getting quotes for diggers, and skips to carry out mass ground excavation, when rarely is this actually necessary. I’ve been carrying out this sympathetic damp repair now for many years along with quantitative moisture analysis (BRE DIGEST 245), and had brilliant results every time in reducing the moisture at the base of the walls by cutting out a channel around 300mm wide, and 150mm below the damp proof course, or internal floor level. One thing I will say is you should seek advice from a structural engineer, or a competent qualified builder, to make sure you don’t compromise the structural integrity of the building by digging below the foundations. You might also need some cutting equipment, with dust suppression, and breakers to get through the concrete/path, and if this this is the case you will need an inspection kit to check for electrics, gas, water pipes etc. This is a service we offer to all of our clients using the Ridgid SR20 detection equipment. The image below shows The Ridgid SR20 and a CCTV drain camera.
Once you’ve marked out the dimensions of the ground you need to lower, you can follow rough guidance from the drawing below.
Please remember roughly a wall takes around 1″ per month to dry down, so if you have a thick old wall this will take a considerable time to dry down. If you need things to happen more quickly we can also carry out tented desiccant drying of the walls in question. This might be necessary if you don’t have time on your hands and you need to get a project finished in time.
How much does it cost to lower high ground levels? This can vary so much depending on access, the length of the area that needs lowering, whether its concrete or just earth that needs digging out, skips etc. I can only price a job once I know all of the above really, and prices will also vary for lowering ground levels by different firms based on many things. Another point that is always worth mentioning is that it is highly likely in most cases you will need some lime pointing carried out at the base of the wall. This is because once the ground levels have been reduced, years of damp, freeze and thaw have damaged the original lime, and it is often like mud once you scrape a mortar bed. Depending on the age of the property we would normally use a lime putty pointing mix, as this will allow more evaporation than a cement based one, or an NHL lime based products. Sometimes its also necessary as a minimum to remove any modern masonry paint at the base of the wall also, as this will increase evaporation also.
If you need any advice drop us an email, or phone the office please.
Please click the on the video below of me explaining about how to lower high ground levels, to try and control rising damp issues.
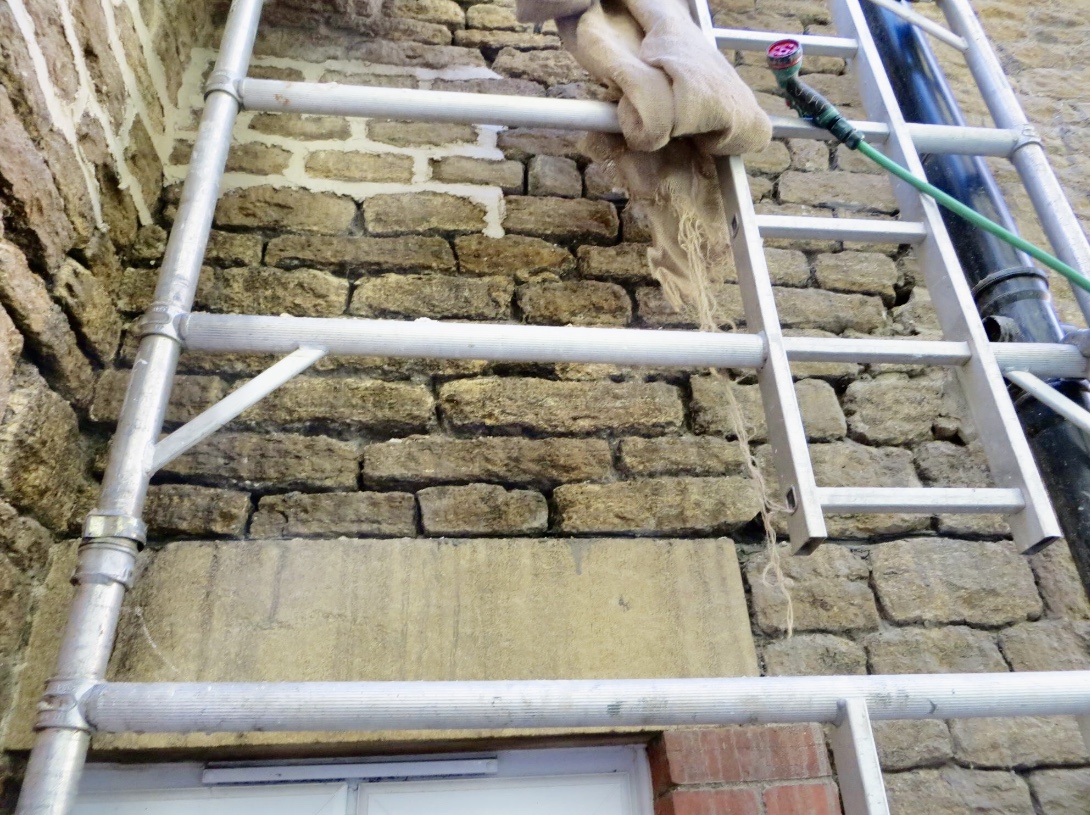
This property had a leaking gutter at the rear of the property. The leak being a long term one caused damp to penetrate internally, and cause damage to the decoration. Because of the long term damp issues, and the freeze and thaw cycles the original lime pointing had eroded away and needed to be replaced.
This was a joy when it comes to removing the old lime pointing as this was easily done. Normally when we do this it’s very time consuming because we have to remove rock hard cement pointing with hand tools only.
The lime pointing mix we use is a lime putty, with graded sands, where we try to replicate the original. The internal lime plaster didn’t need to be replaced, which kept the cost down. We installed drying equipment, this being a desiccant dehumidifier, and created a tent against the wall for targeted drying of the wall. A small amount of filling was needed after, along with a clay paint finish.
Removal of old lime pointing, and replaced with new lime putty pointing The old pointing has been removed and being replaced with a lime putty mix. It’s important to soak the walls down prior to pointing to ensure the lime doesn’t dry back quickly, and to protect with damp hessian
If you need any lime pointing works carried out, then give us a shout
Easy damp survey today. After having previous damp repairs carried out to their property that have subsequently failed, they decided to try and find a damp specialist surveyor that actually wants to eliminate issues before coming to a conclusion of why there is a damp problem.
In this instance the previous surveys, and works were more of a quote to repair a visual damp issue. Unfortunately no drains were tested or leak detection tests were carried out, so the same conclusion was given, and that was to install a dpc (damp proof course).
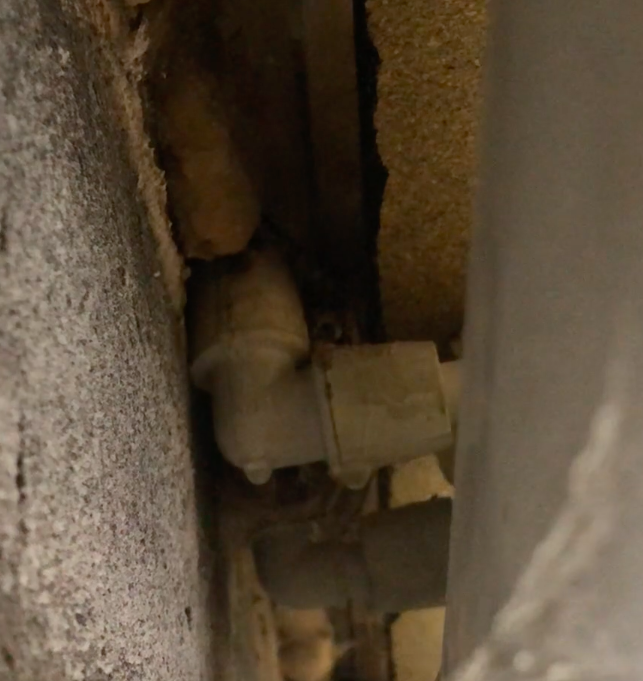
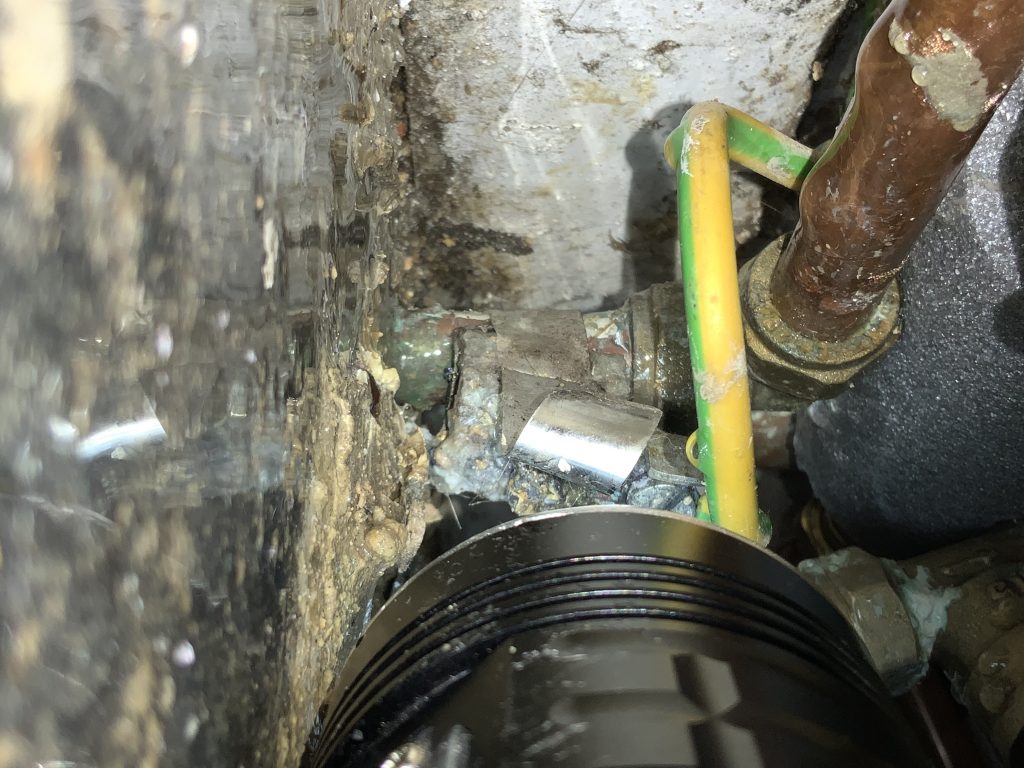
I tend to find there can also be at least a couple of things that always need to be rectified, but in this instance there was one issue. Because the cupboard was full to the brim the previous damp specialists failed to inspect inside the cupboard where the rising water main was. There was a small leak on this, but it wasn’t visible in the cupboard because of the vinyl floor covering. I also did drill a full gravimetric profile just to prove if there were no hygroscopic salts present, which would be indicative of long term genuine rising damp issues.
leaking mains water pipe
Top tip
Expect to pay for a damp survey, and expect to have an invasive survey where plaster samples are removed from the wall, and tested following the methodology in BRE DIGEST 245. It’s always prudent to have a drain CCTV survey to check for any defective drain issues, and even possibly a leaking mains water pipe.
If you need a damp survey where you want to be sure all issues are eliminated, to offer a long term solution give us a shout 🙂