No damp proofing needed

By: admin | Posted on: May 20, 2020

I was recently asked to survey a property that had visible damp issues internally.

I was informed that a ‘damp specialist’ had already visited the property, and had diagnosed rising damp issues, and subsequently recommended a chemical damp proof course has to be installed to fix the rising damp issues. This was carried out around 3 months prior to my survey.

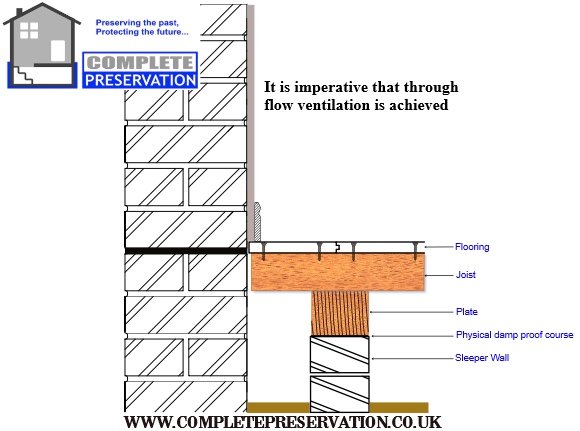
The property is a 1970’s 2 bedroom ground floor flat, this being cavity construction along with a physical damp proof course installed from new.

Any survey starts with the basics like the reported history, the tenant/homeowner that lives in the property can give you so much info that can help with the diagostics especially if it’s only a snap shot survey.

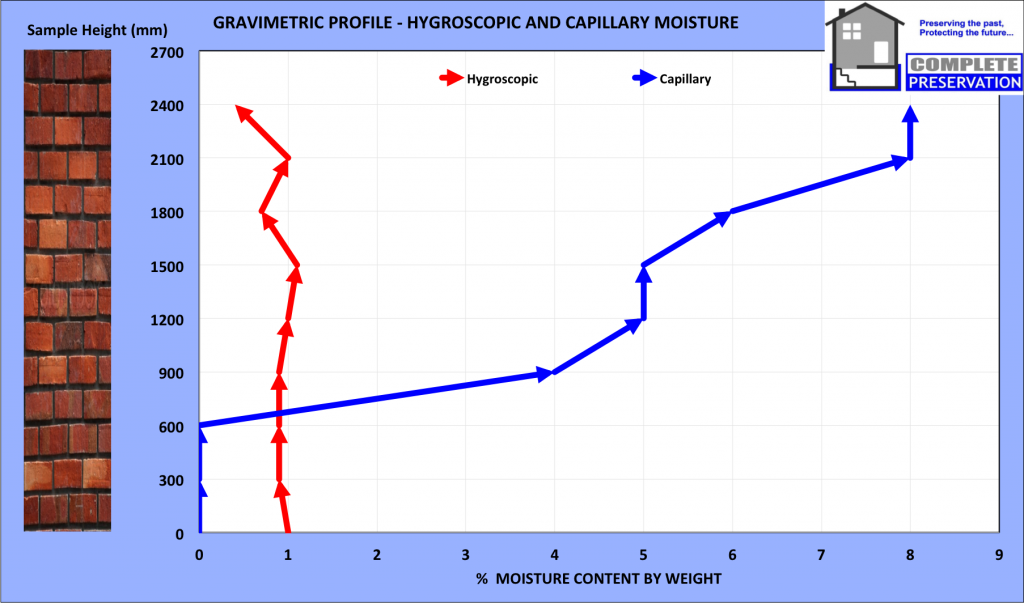
There is often lots of controversy regarding damp meters, these are an excellent tool when used appropriately-there often not though. The pattern of readings I found on the wall when profiling from floor to ceiling didn’t replicate any form of a rising damp profile.

Observations

I noted visible dampness when a bed was pulled out from the wall, mould was noted on the bed, small amounts of condensation on the windows. A very small amount of condensation at the base of the bedroom external walls, mostly behind furniture.

When carrying out surveys I find my Flir T600 gives a great understanding of the building fabric, especially during snap shot surveys. I use this meter linked to a Flir MR77, to produce an isotherm. An isotherm is basically a blue colour on the screen that shows everything at dew point (condensation occurring). What I can also do is change the temperature up or down to find at risk areas, and check these areas with moisture meters etc for patterns of dampness.

flir0815
flir0816-copy

Below shows a visual of the dampness to the wall, possibly a tide mark from rising damp or something else.

img_3760

The below shows mould growth on the wall, mould will not occur on the wall if there has been a long term rising dampness problem with subsequent salts.

img_3763

The below shows the paper was easily peeled back with no damage. Sample pots along with a slow speed drill are being used to collect plaster samples to see if there is any free moisture in the wall (behind the surface-about 20mm in). I follow the methodology in BRE Digest 245 for quantitative results.

img_3778

This is as simple as it gets, and for some reason lots of surveyors never carry out this very basic procedure. We know there is dampness to the surface of the wall, possibly condensation, now after I have drilled out a small sample, I then check the wall with an insulated deep wall probe-this shows if the dampness is at the surface or in the wall is dry. We now know that in the wall is dry, and the surface is damp, we can now carry out profiling up the wall every  just to see if there is a pattern to the dampness issue or another possible issue.

img_3779

Green indicates a dry reading.

img_3780

Dry.

img_3781

You can see the holes where I have taken the samples

img_3782

Holes filled no visible damage from my destructive survey, the paper was put back into place – happy days.

img_3787

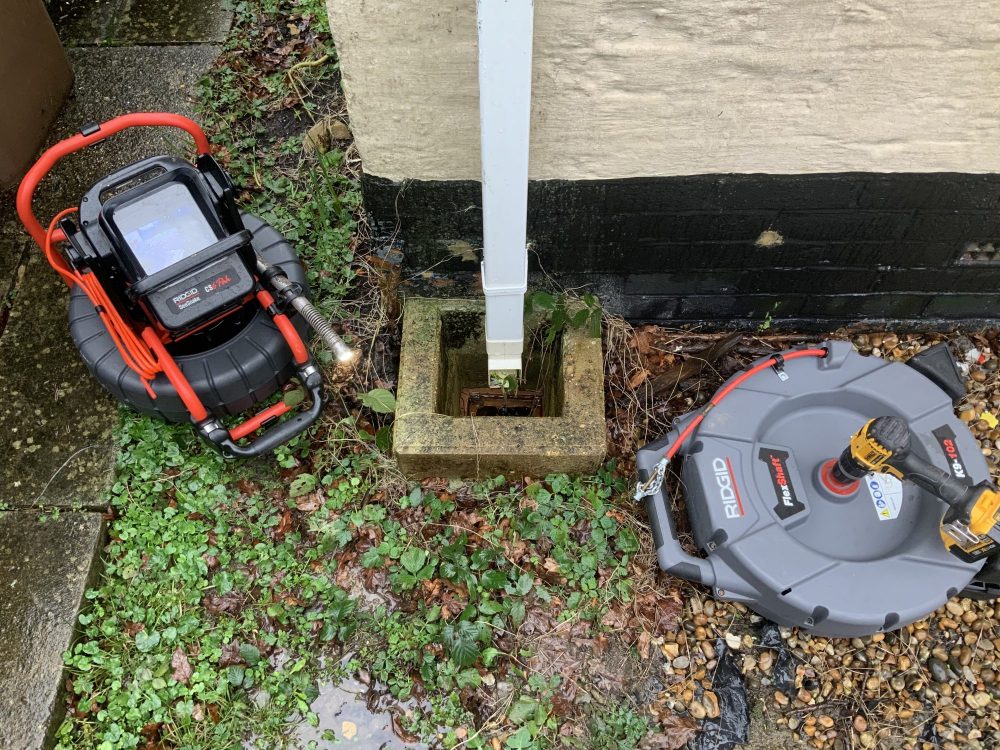
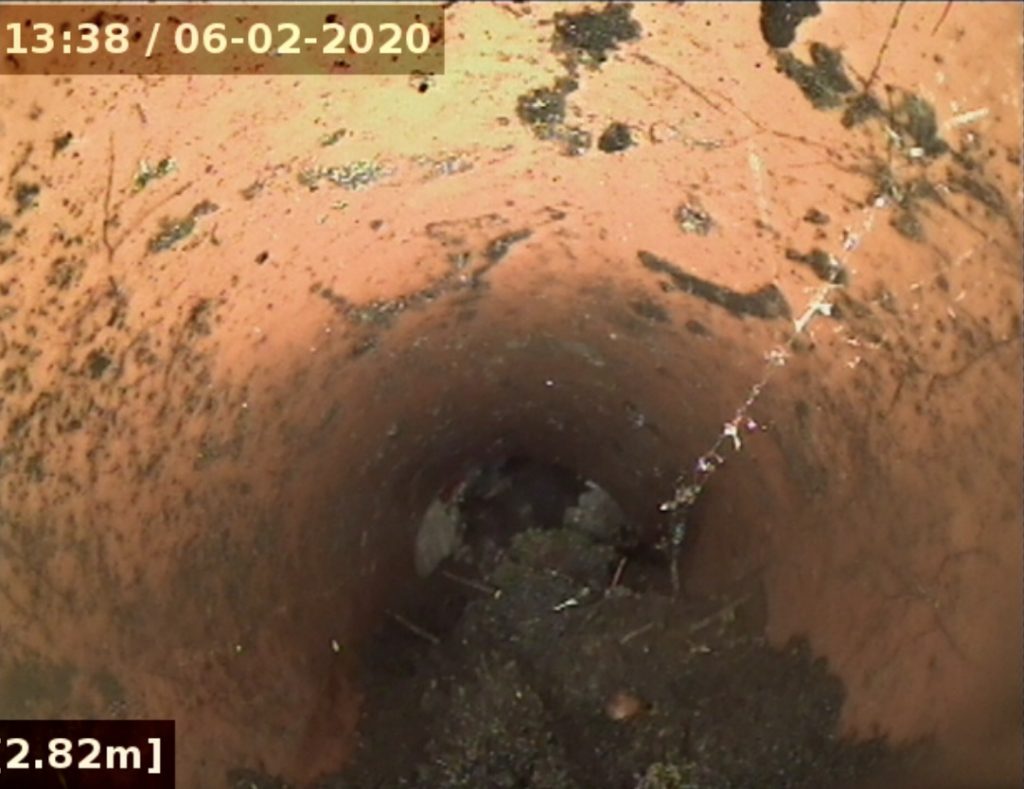
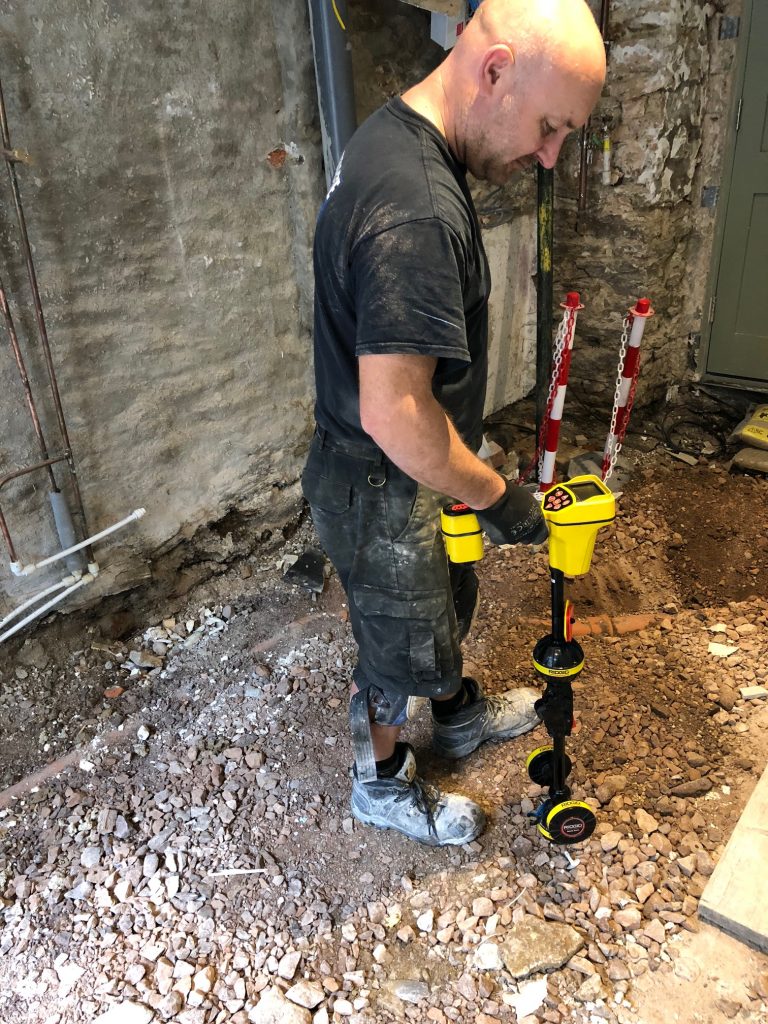
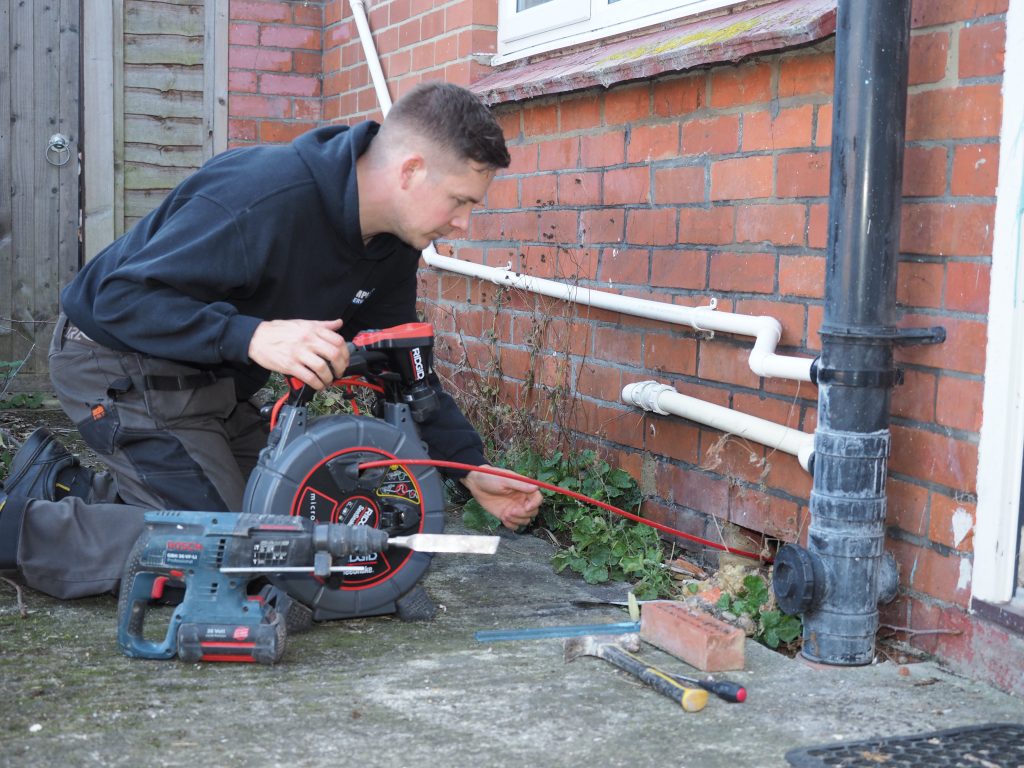
Externally I noted the walls have had retro-fit cavity wall insulation, the visible chemical damp proof course drilled, and some blocked drains.

Click the link to the below video to see what I could see during my inspection.

One thing that concerned me the most was that the damp proofing technician actually drilled the damp proof course through the physical damp proof course!!! Not only that the pointing looked like he applied neat cement with the palm of his hand to cover the injection hole…….not even the slightest attempt to blend in with the original mortar, like he wanted everybody to see his first class bodge up!
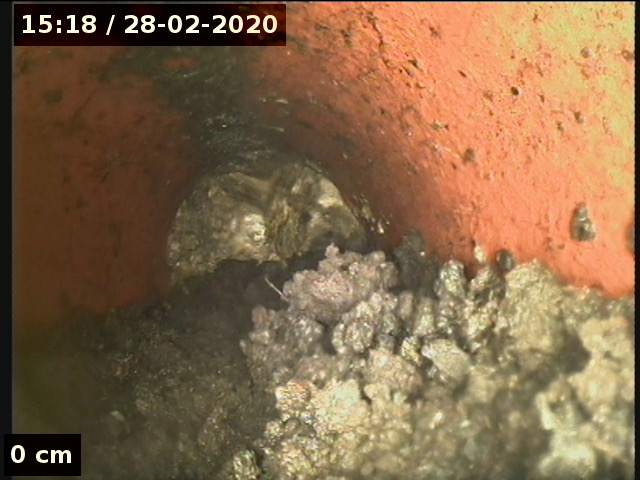
img_3681

Blocked cavity.

img_3797

Chemical damp proof course drilled through physical damp proof course.

img_3799

The chemical damp proof course from another angle.

img_3800

No comment!

img_3802

This issue was a condensation problem, nothing to do with rising damp, and the damp proof course that was drilled into the outer skin only was a complete waste of time.

I know I take longer to do my surveys than some of the other local damp specialists, but I think I offer value for money 🙂


Sympathetic damp vault options

By: admin | Posted on: May 20, 2020

Have you got a damp cellar in a Listed building where you have exposed stone, and the Conservation Officer would prefer this to be left exposed, rather than having the walls cement tanked, or a plastic membrane system?

The Conservation Officers in Bath, always prefer the Ashlar to be left visible, especially when there has been no previous modern repairs.

There are solutions with sympathetic repairs regarding damp that we can offer; however this will not completely stop water from hydrostatic pressure.

One of the causes where vaults are beneath the pavements is sometimes when cables have been installed, and paving slabs have been lifted, waterproofing below normally gets damaged. Sometimes re-pointing the slabs will make a difference as long as the kerbs don’t keep getting mounted by the delivery drivers, and then driving across the slabs again, causing subsequent cracking. I also find that some of these damp vaults also have continual issues with condensation especially in the winter months. Many also have very limited ventilation or no ventilation.

The damp assessment

First of all its always good to get a capillary moisture reading of some of the mortar to ascertain how wet the walls are. Damp meters can’t be used as these often will read hygroscopic salts, especially in below ground areas. We use gravimetric sampling for this (BRE DIGEST 245), which then gives us a reference point that can always be referred back to if needed. Corroventa desiccant dehumidifiers are also needed when the walls are wet. We can then introduce warm, and dry air. This then ensures the walls are dried down, and the stone can be prepared for lime pointing works. Old worn pointing can be removed, and the walls can be deep re-pointed again with lime. Once this has dried down a suitable lime wash can be applied to the walls. Limecrete floors can be used to replace concrete floors if needed, and even some form of drainage if needed, and even possibly a pumped system. All of this then creates a breathable sympathetic traditional repair, which is in keeping with what the Conservation Officer would expect.

Ideally some form of heat and ventilation can be installed to try and keep any moisture balanced in the future.

If you need some advice, and a quotation for some sympathetic damp repairs to vaults, and basements in Bath using breathable materials, please don’t hesitate to contact us. Complete Preservation are leading experts regarding damp issues in Listed buildings around the Bath areas.


Professional suspended timber floor surveys

By: admin | Posted on: May 20, 2020

I often get asked how much does it cost to inspect a floor, and also how can it be surveyed if fitted floor coverings are present. Suspended timber floors are very difficult to survey on a pre purchase survey if the surveyor isn’t able to lift any floorboards to inspect the sub floor. Lots of properties now have laminate floor coverings or vinyl floors stuck down in kitchens, or even tiled,  which no vendor would wish to lift to faciliate a full sub floor investigation.

Most surveys the surveyor will often do a bounce test to the floors where they will jump on the floor to feel how firm it is under the foot, if the floor is carpeted it maybe possible to stick a damp meter into the timber and measure the moisture content of the timber, and look at the levels of the floors to see if the floor has dropped in places etc. We also use hammer probes that can go through carpets and floorboards to measure moisture content of joist ends.

A surveyor will also see how many, and the location of air bricks, and also note ventilation pathways. For example if the property is a middle terrace with a living room and dining room, with a new build kitchen at the rear incorporating a solid floor, this would be restricting cross flow ventilation pathways if there is no ducting present through the new solid floor. It is common for builders not to incorporate ducting from the timber suspended floor through the new solid floor to ventilate out. See diagram below.

SUSPENDED TIMBER FLOOR SURVEY

So what can you do to take the survey a step further?

A hammer probe can be used to check the moisture content of the surface of the timber through a carpet and also through into the timber joist. A good place to check to find a loose floorboard to lift is the under stairs cupboard or a built in cupboard typically by the fireplaces. It maybe possible to drill a small hole in a floor board and view the floor with a high powered boroscope. Sometimes it is possible to remove an air brick and insert a snake camera system, and our high resolution CCTV drain camera where we can also photograph and video the defects for the report.

IMG_0742.jpeg
sub floor inspection / survey

We also use where a possible a remote control car that has lighting and a video camera installed that can reach hard to access areas.

In an ideal world many of the floorboards would be lifted so you can actually visually check the floorboards, joists and plates. Cellar fungus decay typically leaves a thin surface veneer, and it’s not until you drive a bradawl into the timber you notice how significant the decay actually is.

Why is ventilation important?

Ventilation is paramount to prevent decay and woodworm infestation, fungal decay and woodworm need moisture to survive, without this they will not survive. Timber is naturally hygroscopic, this means it will absorb moisture from the surrounding air. Suspended timber floors are cold places, with cold temperatures subsequently there will be high relative humidity readings. Older historic properties are more likely to have a hardwood flooring timbers, this is less prone to decay and infestation unlike modern fast grown softwood. Most of the really active woodworm infestations I find are where the floor is a softwood, some of these floors have been dangerous and have collapsed.

The below picture shows a severe active woodworm infestation, this was in a property in Trowbridge Wiltshire.

active woodworm frass

The fungal decay is a dry rot, this is from the sub floor which consisted of new pre treated timber, the ends of the timber were not treated hence thats where it appears the rot has started. This dry rot was in a suspended timber floor in Wiltshire.

dry rot in a suspended timber floor

See the graph below that we produce in excel, we also use this data logging for the internal environment typically for condensation and mould surveys. Where the green and the blue line cross shows when condensation is occurring, the floor was virtually suffering from condensation during the whole time it was being monitored. This is why there was severe timber decay issues.

DATA LOGGING OF THE SUB FLOOR VOID

Sub floor condensation is where water droplets are dripping actually off the floorboards. Below is a picture of a sub floor condensation issue, and there is also a significant dry rot issue, this was caused because there was a lack of sub floor ventilation in this property situated in Devizes Wiltshire.

dry rot in a sub floor

The below picture shows sub floor condensation issue and early signs of wet rot fungal decay in a property in Trowbridge Wiltshire.

wet rot in a suspended timber floor

The two below graphs show data logging of the sub floor void, this is measuring cross flow ventilation from the from and the back of the house. This is carried out using a calibrated anemometer, looking at the graph you can see how this went up and down because of the wind, even in that short space of time. This showed there was adequate cross flow ventilation in the sub floor void.

measurement of cross flow ventilation in a sub floor void
measurement of cross flow ventilation is a suspended timber floor void

Another thing that some people fail to realise is that the suspended timber floor void can also be partly controlled by the internal environment, if you have very high vapour pressure in the building because of poor mechanical ventilation as this will go to low vapour pressure, like the roof void and also the sub floor. You can also find in suspended timber floors that when you have earth beneath them that is damp / wet, the vapour pressure in the sub floor void will be higher than in the house.

A really important thing to remember that hardly ever gets considered is the fact that damaged drains, and also how waste water discharges into the the gulley. As you can imagine the amount of moisture these defects produce are often enough to cause such serious issues with the floor, complete replacement is needed. Many jobs I get involved in, are to fix other contractors works, where the actual root causes haven’t been identified in the first instance. The reason this occurs is because free damp and timber surveys, and dry rot surveys, and even damp and timber surveys where a fee is paid, these basic root causes of moisture are not always inspected. Some contractors try to win work, by being cheaper and the client is under the impression that the works is still being carried out correctly.

The video below shows some tips, and common problems that many homeowners have. It is imperative that you identify the basics like in this video, as you will see the timber decay / rot issue, and also the costs involved can be very expensive.

I often get asked about if timber treatment for woodworm, and timber decay is necessary. This can be a difficult subject for a layperson because you will find two camps. One say that timber treatments will be needed in certain conditions, and the others say it is never needed. I’ve spent many years monitoring buildings where data has been collected, and also where I have infested timber with woodworm. I will be doing a video and blog post on this shortly after 4 years of data collection, and what it shows is that some areas of a building will need some form of intervention because these are at risk.

If you need a sub floor survey / camera sub floor survey / investigation for woodworm or dry rot / wet rot please contact us and we would be happy to assist you. If you need a CCTV drain survey to check whether this could be causing dry rot to your suspended timber floor, this is something we can help you with also. We also offer specialist controlled drying of suspended timber floor voids, to bring them back to equilibrium, to ensure timbers are out of the risk zone.

Contact us to discuss options on 01225 769215

Or email enquiries@completepreservation.co.uk


Damp survey Trowbridge Wiltshire

By: admin | Posted on: May 20, 2020

Picture it 1970’s property which is of cavity construction, and has a physical damp proof course. Now a decent surveyor that understands this era of property will without doubt know this property will not have an issue with a broken down damp proof course.

My client has spent many thousands of pounds trying to fix this issue over a few years. Unfortunately a few free damp surveys later they were offered the same option, which was a new damp proof course and replastering. This area had a chemical damp proof course installed and re-plastered on two occasions. After they had lost faith with modern repairs they trawled the internet, and then decided to use lime plaster as it’s a breathable material. Unfortunately this never really dried down, and also became damp at the base of the wall

The survey

One of the most important part of any damp survey is opening up. By this I mean breaking out the floor and wall junction and inspecting for a physical damp proof course, and a damp proof membrane in the floor. Once you can prove these are in place, and not defective or bridged it’s another possible cause that has been eliminated.

It is well documented in the British Standards by the process of elimination by opening up on site still sometimes isn’t enough, and mortar/plaster samples will need to be removed to check for moisture and the amount, and if any hygroscopic salts are present.

Mortar/plaster sampling (BRE DIGEST 245) confirms how wet, or dry the wall is, and also I carry out other tests to see if there is any hygroscopic salts present. Identification and the amount of hygroscopic salts present is really important to confirm if there has been a long term rising damp issues, because of genuine rising damp. At this property for instance none of the previous damp specialists hadn’t done any opening up or took plaster samples. This isn’t unusual because most free or cheap surveys this will never happen because many people presume they know whats going on with no facts, and this is why damp issues don’t get fixed first time.

In this instance the previous surveys made the fatal mistake of presuming it was a genuine rising damp issue, this being without a defect. If they would have taken the time they could of proved that there were issues with bridging plaster of the damp proof course and also debris within the cavity.

When I opened up the floor and wall junction and drilled out my first mortar sample I had an idea of what the issue was straight away. Although there was a bridging issue, as one of the causes, the other really important factor was that the sample was very wet. Because it was so wet, this is very unlikely to be just a bridging of the damp proof course issue, and likely to be a leak, or drain issue. I carried on drilling a vertical profile anyway following the methodology in BRE DG 245, as I still wanted to be certain of the distribution of moisture and the potential for hygroscopic salts. Once all of the plaster/mortar samples were labelled and stored away I then checked the drains with our CCTV drainage equipment for potential issues. No defects were noted.

I then used some leak detection equipment to try and locate/eliminate a potential leak. Leak detection has moved on from walking around with some old bent coat hangers to more modern advanced electroacoustic ground mics.

When a pressurised water pipe leaks the water flows out which causes the pipe and surrounding material (mud, concrete tarmac) to vibrate. This sound, or vibration, is transmitted along the pipe (structure borne water leak noise) and through the surrounding material (ground borne water leak noise). With the Aquaphon A200 ground mic set listening for these water leak noises is now easier than ever before.  By using this equipment I then found the leak on the mains coming into the property. By carrying out simple straight forward damp surveying methodology you can see how I found the leak and eliminated/found other potential defects. The gravimetric sampling laboratory analysis was also carried out after the survey, as this takes a few days and this confirmed 25 % free moisture at the base of the wall up to 500mm, and there were no high levels of nitrates and chlorides as you would have expected if there was a long term genuine rising damp issue.

My client was obviously happy that the issues had been identified and it was also visibly obvious to her. Moving forward with repairs, we repaired the leak, and installed desiccant drying equipment. Checking the drying of the property and confirming it has dried completely down. Once the walls dried down our client carried out her own decoration. She is also getting legal advice to recover costs and previous works that wasn’t necessary.

So what have we learnt?

  1. Expect to pay for a damp survey, and not a cheap one
  2. Ask to get a price for an invasive survey, and get this confirmed. If they don’t offer this service give them a miss
  3. Ask them if they offer leak detection or drain surveys
  4. Do they offer gravimetric sampling following BRE DIGEST 245, and how many samples per survey. If they don’t they will not be following the guidance in the British Standards
  5. The below graph shows the distribution of moisture, and the level of hygroscopic salts present. This is what you should be getting for exact confirmation of your issues. This is well documented in all of the British Standards. See this link for screenshots of the British Standards regarding this. The link will be very valuable to you, so make sure you read this. It will help you with any further questions you may have when you question your damp surveyor prior to a damp survey. http://www.completepreservation.co.uk/2019/08/13/rising-damp-the-facts/

If you need any help give us a shout 🙂


this image shows the thermtech masonry paint removal equipment we use. This is similar to the doff paint removal system also. what is the best way to remove paint. what is the easiest way to remove paint. chemical free paint removal. paint removal cost

Modern masonry paint removal

By: admin | Posted on: May 20, 2020

Modern masonry paint especially if it hasn’t been kept in good decorative order, and painted to the floor can trap in any rising damp, or any penetrating damp. Unfortunately many older buildings have suffered from the wrong types of external masonry paints over years where subsequent paint continually gets applied every few years that will eventually restrict evaporation, and tip the building moisture balance. Over many years soft red bricks start to spall and some limestone will also spall. Years ago, and dare I say now contractors often specified sand and grit blasting to remove modern paints, and this can actually cause more damage to the masonry. We purchased a ThermaTech Super heated hot water system a few years ago due to the repairs we carry out on traditional and listed buildings.

The ThermaTech modular system Since its introduction, ThermaTech® has quickly become established as a frequently named and specified cleaning and restoration method, being used in a number of important and notable projects. To date, it has been used on Royal Palaces (including the Palace of Westminster), Cathedrals, prestigious landmark buildings like Tower Bridge, as well as a wide range of other heritage structures. ThermaTech is a modular range of equipment producing superheated water at temperatures up to 150ᵒC, for the purpose of masonry cleaning, paint removal and coatings removal on heritage and other structures.

We now have the ability to combine the use of a superheated water system, with an adjustable and effective abrasive flow, is now viable and available through an optional abrasive attachment for ThermaTech® systems. innovative and ground breaking combination is actually able to create a pressurised mixture of hot water and abrasive medium, whereas in the past, superheated and steam systems would have had limited success with NON-Temperature responsive coatings (such as cements/ lime based paints, carbon sulphation, lime effervescence etc).

Coatings or deposits that remain brittle at 150° can however often yield to the application of abrasive, giving a ‘mechanical’ advantage and this combination of ThermaTech® with this attachment will now provide even more distinct advantages over the many other commercially available superheated and steam systems.

Our light abrasive attachment kit is specifically designed to connect the ThermaTech® gun, and can be used up to 100°C temperature. This game changer has made life much easier for us with a more potable kit, and makes life also easier for when we carry out test patches.

The ThermaTech system about to be put to the test with this masonry paint removal job.

Before masonry paint removal with the ThermaTech system

This building now looks absolutely stunning now we have carried out the masonry paint removal and lime pointed by Complete Preservation. This transformation makes you think why on earth this building was actually painted in the first instance.


CORONAVIRUS INSPECTION PROTOCOL

By: admin | Posted on: March 16, 2020

Please read the below advice

How to avoid catching and spreading coronavirus (social distancing)

Everyone should do what they can to stop coronavirus spreading.

It is particularly important for people who:

  • are 70 or over
  • have a long-term condition
  • are pregnant
  • have a weakened immune system

Do

  • wash your hands with soap and water often – do this for at least 20 seconds
  • always wash your hands when you get home or into work
  • use hand sanitiser gel if soap and water are not available
  • cover your mouth and nose with a tissue or your sleeve (not your hands) when you cough or sneeze
  • put used tissues in the bin immediately and wash your hands afterwards
  • avoid close contact with people who have symptoms of coronavirus
  • only travel on public transport if you need to
  • work from home, if you can
  • avoid social activities, such as going to pubs, restaurants, theatres and cinemas
  • avoid events with large groups of people
  • use phone, online services, or apps to contact your GP surgery or other NHS services

Don’t

  • do not touch your eyes, nose or mouth if your hands are not clean
  • do not have visitors to your home, including friends and family

The NHS will contact you from Monday 23 March 2020 if you are at particularly high risk of getting seriously ill with coronavirus. You’ll be given specific advice about what to do.

Do not contact your GP or healthcare team at this stage – wait to be contacted.

Who is at risk?

How coronavirus is spread

Because it’s a new illness, we do not know exactly how coronavirus spreads from person to person.

Similar viruses are spread in cough droplets.

It’s very unlikely it can be spread through things like packages or food.

Travel advice

There are some countries and areas where there’s a higher chance of coming into contact with someone with coronavirus.

If you’re planning to travel abroad and are concerned about coronavirus, see advice for travellers on GOV.UK.

Treatment for coronavirus

There is currently no specific treatment for coronavirus.

Antibiotics do not help, as they do not work against viruses.

Treatment aims to relieve the symptoms while your body fights the illness.

You’ll need to stay in isolation, away from other people, until you have recovered.

More information

INSPECTION AND OFFICE PROTOCOL IN RESPECT OF CORONAVIRUS AS AT 17 MARCH 2020

INSPECTION SPECIFIC

1). The company will continue to carry out inspections but will have a heightened awareness of the risk of coronavirus and its spread. Our company will adhere to government advice and directions. 

2). At the time of making an appointment the company will also attempt to ensure that neither the surveyor carrying out the inspection nor any employee of Complete Preservation, have tested positive for Covid 19 and are not displaying any symptoms (fever/ dry cough etc). Similar assurances will be required from the person(s) who will be present at the time of the property inspection. If these cannot be given then we will politely refuse to inspect. 

3). Any change to the risk at any time up to the time of the inspection will be notified to the other party and the appointment re-arranged or postponed. 

4). An exception will be that Complete Preservation will not inspect any property where an occupant is over the age of 70, pregnant, or people with weakened immune systems and people with conditions such as diabetes, heart and lung disease which are also more vulnerable to serious illness.

We appreciate that this is likely to be confidential information, but this is a very significant matter and we are committed to do everything to help reduce the risk of transmission of this virus. Arrangements to inspect will be made, as a priority, as soon as it becomes clear it is safe to do so. 

5). Complete Preservation will have available disinfectant hand gel or equivalent and / or latex gloves. They will apply disinfectant gel prior to and after each inspection.

OFFICE SPECIFIC
 
6). For the foreseeable future, cups and utensils will be individualised to each colleague who will be responsible for thorough cleaning. All colleagues will be expected to thoroughly wash their own hands and dry them with a paper towel. 

7.) If any colleague has had symptoms they shall self isolate for the minimum time period (presently 14 days set out by the government), plus an additional 14 working days. 

8.) Colleagues returning from outside the UK will be required to self isolate for 14 days. 

9.) As an overriding factor, we will observe and adhere to all the requirements of the UK government and their chief medical advisor. 

10). This policy will take effect immediately. It may also be subject to change without formal notice.


Drain surveys to eliminate rising damp issues

By: admin | Posted on: March 2, 2020

So you’ve been told you have rising damp. Have you had every potential damp issue eliminated, or are you just treating the symptom?

Elimination is needed to offer a long term solution. It is often the case where no mortar/plaster sampling has been carried out (BRE DIGEST 245 / gravimetrics), and subsequent analysis, and some form of opinion has been offered in regards to damp diagnosis. Whether you’ve had a free damp survey, or paid for a damp survey you need to be sure the diagnosis is correct.

I often find issues with drains, soak aways, leaks that haven’t been checked previously.

The below image shows a completely blocked soak away in Wiltshire, resulting in rainwater backing up and subsequently the cavity wall insulation being blown fibre was saturated. Various reasons for the damp had been previously given by previous damp surveyors, and unfortunately none of the previous damp surveyors had inspected this. Sometimes to be fair this might seem unnecessary to carry out a drain survey, but if the insulation is wet, and there are very high free moisture readings noted at the base of the wall this would definitely need to be eliminated as a potential cause of the damp.

This image shows the root cause of rising damp. This is where it is imperative to have a cctv drain survey carried out

The below image shows another blocked drain, and root intrusion in Wiltshire. Again there was suspected rising damp issues adjacent this area internally at the base of the solid red brick wall. Gravimetric testing/sampling showed there was lots of free moisture at the base of the wall with no nitrates, chlorides (hygroscopic salts) present. If these hygroscopic salts were present at high levels depending on other factors, it can possibly point more to a genuine long term rising damp issue. In this instance it points to a potential drain issue, or a mains leak as the cause of the damp issues. I would expect an averagely competent damp specialist to understand this. Unfortunately the previous damp surveyor hadn’t checked this.

This image shows the root cause of rising damp. This is where it is imperative to have a cctv drain survey carried out

The below image shows an inspection to check the location of a soakaway. This can be located with our sonde equipment. The sonde is also used when marking up drainage defects where repairs need to be carried out. Unfortunately this soak-away was only installed 1.5meters away from the property, which could cause subsidence issues in the future.

This image shows the root cause of rising damp. This is where it is imperative to have a cctv drain survey carried out

If you have damp issues what should you do?

A really good tip is to get an umbrella and stand outside of your property during heavy rain. Pay attention to the gutters and drains, and look for any drips/leaks or drains backing up, or even drains slowly draining. You can sometimes see ponding water, which perhaps could be drainage issues or blocked soakaways. Make sure you keep gutters clear of leaves and moss, as these will shorten the working life of soakaways.

To learn more about the high percentage of drain defects in relation to rising damp please see our videos below. I offer root cause rising damp solutions, from small houses, to large Country houses.

This video shows the latest joint damp methodology by Historic England, RICS, SPABA and the Property Care Association. See the external defects found, and also the gravimetric sampling following BRE DIGEST 245.


Rising damp survey Wiltshire

By: admin | Posted on: January 12, 2020

This shows the very basic damp issues can get confused by some damp survey specialists. In this instance you will see the value of having a paid survey following the methodology in BRE DIGEST 245, which is the only quantitative way to measure moisture, and confirm rising damp with a moisture profile.

My client had a number of free damp surveys and the damp issues on the external wall had been diagnosed as rising damp two times, and also hygroscopic salt damp. This was all diagnosed with a damp meter only, and this isn’t what any of the BRITISH STANDARDS recommend.

When I used the damp meter with the two pins (wme mode) just to map out the moisture in the wall, I noted there were no high readings at the base of the wall, or the skirting board, which would provide a more reliable reading regarding moisture. What I did note was higher readings at high level when the damp meter was used in search mode.

Externally the building is solid red brick and exposed, now this is important because we know there can be a possible issue with penetrating damp because of wind driven rain. On further inspection I noted issues around the lintel that would allow penetrating damp an obvious route into the building.

Now I can understand why the damp surveyor thought it could be hygroscopic salts because often these can be found at higher level. I can’t understand how the other damp surveyors thought it was rising damp, and that a new damp proof course would fix the issues. I can’t understand that the damp surveyors never actually noted the location of the property in regarding the exposed position, and also the external defects.

The below graph shows the moisture profile following BRE DIGEST 245 carried out by Complete Preservation. This visually shows to even a layperson there is no capillary moisture at the base of the wall and that higher levels of capillary moisture are at ceiling height, that are adjacent the external defect. There are no hygroscopic salts present, and no high levels of hygroscopic moisture, which indicates there isn’t a rising damp issue, and never has been a long term rising damp issue.

BRE DIGEST 245 MOISTURE PROFILE

Now whats the solution of repairing the damp issue?

Simply fixing the external defect by carrying out some lime pointing where voids are visible. And then drying the wall down with tented desiccant drying equipment to ensure there is no risk to the timber lintel. Whilst there is an initial survey fee, you can see the value in this, and also the cost of repairs are a lot cheaper than a new damp proof course and plastering. Oh, and there is no disruption and mess to deal with 🙂

We carried out the lime pointing repairs, and the installed the desiccant drying equipment, and signed it off as dry when finished. The client was also a guest on our SuperVision real time moisture data loggers so they could actually log in to see how it was drying down for a transparent service.

If you have a damp issue please don’t hesitate to get in contact with us 01225 769215

enquiries@completepreservation.co.uk


Tracing leaks

By: admin | Posted on: January 7, 2020

It doesn’t matter how clever you think you are, or how much building experience you have, you need specialist kit to help you get fast and correct diagnosis when it comes to leaks. This property had been recently renovated and waterproofed by a developer. The waterproofing should have been a Type C system really rather than a Type A, and had failed because damp issues were visible. On opening up the building we noted the works were not carried out by an averagely competent specialist, and it appeared that there were issues with drainage etc. On checking with our drain cameras we noted the connections were leaking, when the new pipe met the old, and there was a leaking old galvanised water pipe. These pipes were replaced with new, as in the longterm we needed to be sure this property would be free from issues like this again.

Drain survey


Sub floor ventilation survey

By: admin | Posted on: January 7, 2020

Often it can be difficult to see if there is any sub floor timber decay or woodworm when floorboards can’t be lifted, because of floor coverings. This is when we need some help with our super bright drain cameras. Whilst it’s not as good as good as getting a bradawl and giving the timber a good poke, it’s the next best thing. Alls we need to do is remove the air brick or air vent externally, and guide the camera through the wall. We can then take pictures and record videos. This is often used when a Chartered surveyor has picked up issues with the suspended timber floor on a pre purchase survey, and has asked for further recommendations regarding the issue. We can help in this case most of the time. If you need a suspended timber floor survey, give us a shout