Damp survey Trowbridge Wiltshire
By: admin | Posted on: May 20, 2020
Picture it 1970’s property which is of cavity construction, and has a physical damp proof course. Now a decent surveyor that understands this era of property will without doubt know this property will not have an issue with a broken down damp proof course.
My client has spent many thousands of pounds trying to fix this issue over a few years. Unfortunately a few free damp surveys later they were offered the same option, which was a new damp proof course and replastering. This area had a chemical damp proof course installed and re-plastered on two occasions. After they had lost faith with modern repairs they trawled the internet, and then decided to use lime plaster as it’s a breathable material. Unfortunately this never really dried down, and also became damp at the base of the wall
The survey
One of the most important part of any damp survey is opening up. By this I mean breaking out the floor and wall junction and inspecting for a physical damp proof course, and a damp proof membrane in the floor. Once you can prove these are in place, and not defective or bridged it’s another possible cause that has been eliminated.
It is well documented in the British Standards by the process of elimination by opening up on site still sometimes isn’t enough, and mortar/plaster samples will need to be removed to check for moisture and the amount, and if any hygroscopic salts are present.
Mortar/plaster sampling (BRE DIGEST 245) confirms how wet, or dry the wall is, and also I carry out other tests to see if there is any hygroscopic salts present. Identification and the amount of hygroscopic salts present is really important to confirm if there has been a long term rising damp issues, because of genuine rising damp. At this property for instance none of the previous damp specialists hadn’t done any opening up or took plaster samples. This isn’t unusual because most free or cheap surveys this will never happen because many people presume they know whats going on with no facts, and this is why damp issues don’t get fixed first time.
In this instance the previous surveys made the fatal mistake of presuming it was a genuine rising damp issue, this being without a defect. If they would have taken the time they could of proved that there were issues with bridging plaster of the damp proof course and also debris within the cavity.
When I opened up the floor and wall junction and drilled out my first mortar sample I had an idea of what the issue was straight away. Although there was a bridging issue, as one of the causes, the other really important factor was that the sample was very wet. Because it was so wet, this is very unlikely to be just a bridging of the damp proof course issue, and likely to be a leak, or drain issue. I carried on drilling a vertical profile anyway following the methodology in BRE DG 245, as I still wanted to be certain of the distribution of moisture and the potential for hygroscopic salts. Once all of the plaster/mortar samples were labelled and stored away I then checked the drains with our CCTV drainage equipment for potential issues. No defects were noted.
I then used some leak detection equipment to try and locate/eliminate a potential leak. Leak detection has moved on from walking around with some old bent coat hangers to more modern advanced electroacoustic ground mics.
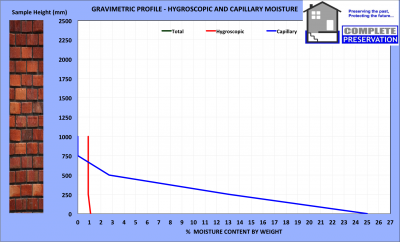
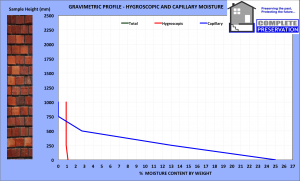
When a pressurised water pipe leaks the water flows out which causes the pipe and surrounding material (mud, concrete tarmac) to vibrate. This sound, or vibration, is transmitted along the pipe (structure borne water leak noise) and through the surrounding material (ground borne water leak noise). With the Aquaphon A200 ground mic set listening for these water leak noises is now easier than ever before. By using this equipment I then found the leak on the mains coming into the property. By carrying out simple straight forward damp surveying methodology you can see how I found the leak and eliminated/found other potential defects. The gravimetric sampling laboratory analysis was also carried out after the survey, as this takes a few days and this confirmed 25 % free moisture at the base of the wall up to 500mm, and there were no high levels of nitrates and chlorides as you would have expected if there was a long term genuine rising damp issue.
My client was obviously happy that the issues had been identified and it was also visibly obvious to her. Moving forward with repairs, we repaired the leak, and installed desiccant drying equipment. Checking the drying of the property and confirming it has dried completely down. Once the walls dried down our client carried out her own decoration. She is also getting legal advice to recover costs and previous works that wasn’t necessary.
So what have we learnt?
- Expect to pay for a damp survey, and not a cheap one
- Ask to get a price for an invasive survey, and get this confirmed. If they don’t offer this service give them a miss
- Ask them if they offer leak detection or drain surveys
- Do they offer gravimetric sampling following BRE DIGEST 245, and how many samples per survey. If they don’t they will not be following the guidance in the British Standards
- The below graph shows the distribution of moisture, and the level of hygroscopic salts present. This is what you should be getting for exact confirmation of your issues. This is well documented in all of the British Standards. See this link for screenshots of the British Standards regarding this. The link will be very valuable to you, so make sure you read this. It will help you with any further questions you may have when you question your damp surveyor prior to a damp survey. http://www.completepreservation.co.uk/2019/08/13/rising-damp-the-facts/
If you need any help give us a shout 🙂

