
Why and how to reduce ground levels
By: admin | Posted on: May 23, 2020
You’ve obviously been given some information from perhaps a Chartered Surveyor that has carried a Homebuyers survey, or perhaps another kind of building survey, and are seeking advice from the internet. Well hopefully this will give you an idea of what is needed to help stop/control the rising damp issues you have.
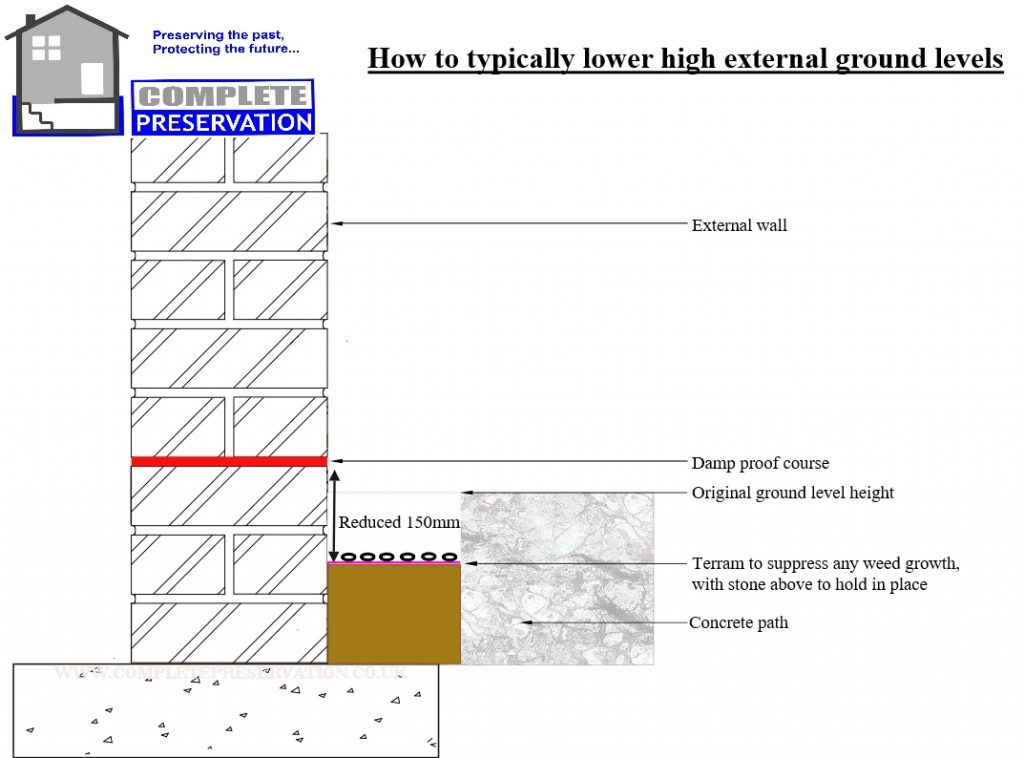
Ideally external ground levels where possible should be lower than the damp proof course (dpc) by around 150mm / 6″). This will help to prevent rainwater splashing over the dpc (damp proof course), especially when there is heavy wind driven rain. If a damp poof course isn’t present it will also still help keep the base of the wall dry, so is still necessary. By lowering the ground levels to beneath the damp proof course, this can also stop bridging of the damp proof course, ensuring that the damp proof course performs as to be expected (to stop rising damp). Also by lowering the external ground levels you will also control the height of rise, of any rising damp. This will create evaporation at the base of the wall at lower level, as you’ve simply stopped giving the rising damp moisture to gain in height. Obviously the height of rise depends on many things but basic things like how wet the ground is, and the suction from the wall. But nonetheless this will massively help the issue, and sometimes completely solve/control the rising damp issue.
A common problem I often come across is that by lowering the ground levels doesn’t fix the issue. What I mean by this is the perception of that there is still a problem visibly internally to the plaster as it looks like it’s damp still. This occurs because the damp patch isn’t damp because of capillary moisture (rising damp) any more, it’s still damp because hygroscopic salts like nitrates and chlorides (hygroscopic moisture) are present in the plaster, and are absorbing moisture from the internal atmosphere. Sometimes you can also get the appearance that it is dry one day, perhaps on a warm sunny day in the summer when the humidity is lower, or it appears again when its humid, because the damp becomes more visible when the humidity is higher because it is hygroscopic. If this is the case the wall would have been contaminated by hygroscopic salts for a considerable time previously. One way to eliminate this is to take plaster/mortar samples following the guidance in BRE DIGEST 245, as this is the only quantitative way to differentiate between hygroscopic and capillary moisture. This is a service we offer to all of our clients as part of our damp consultancy service.
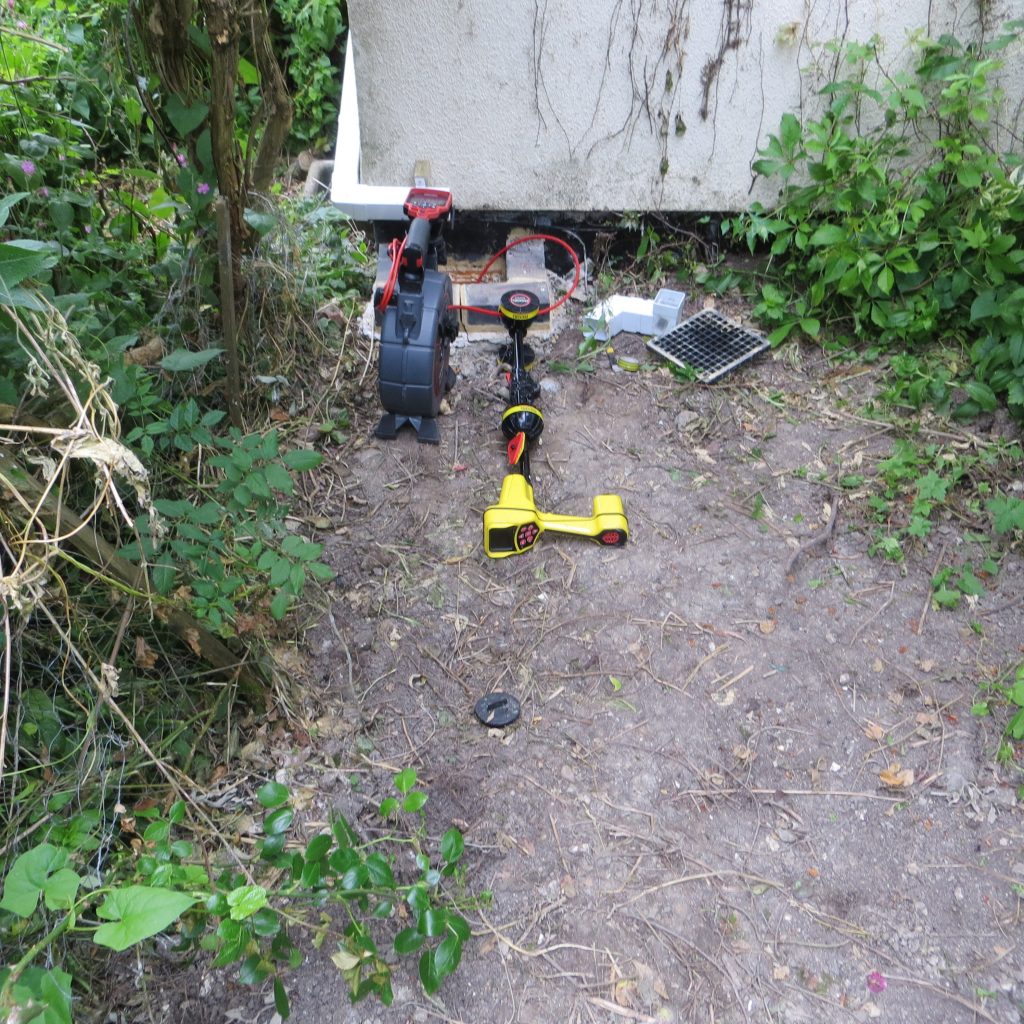
Again often people have been getting quotes for diggers, and skips to carry out mass ground excavation, when rarely is this actually necessary. I’ve been carrying out this sympathetic damp repair now for many years along with quantitative moisture analysis (BRE DIGEST 245), and had brilliant results every time in reducing the moisture at the base of the walls by cutting out a channel around 300mm wide, and 150mm below the damp proof course, or internal floor level. One thing I will say is you should seek advice from a structural engineer, or a competent qualified builder, to make sure you don’t compromise the structural integrity of the building by digging below the foundations. You might also need some cutting equipment, with dust suppression, and breakers to get through the concrete/path, and if this this is the case you will need an inspection kit to check for electrics, gas, water pipes etc. This is a service we offer to all of our clients using the Ridgid SR20 detection equipment. The image below shows The Ridgid SR20 and a CCTV drain camera.
Once you’ve marked out the dimensions of the ground you need to lower, you can follow rough guidance from the drawing below.
Please remember roughly a wall takes around 1″ per month to dry down, so if you have a thick old wall this will take a considerable time to dry down. If you need things to happen more quickly we can also carry out tented desiccant drying of the walls in question. This might be necessary if you don’t have time on your hands and you need to get a project finished in time.
How much does it cost to lower high ground levels? This can vary so much depending on access, the length of the area that needs lowering, whether its concrete or just earth that needs digging out, skips etc. I can only price a job once I know all of the above really, and prices will also vary for lowering ground levels by different firms based on many things. Another point that is always worth mentioning is that it is highly likely in most cases you will need some lime pointing carried out at the base of the wall. This is because once the ground levels have been reduced, years of damp, freeze and thaw have damaged the original lime, and it is often like mud once you scrape a mortar bed. Depending on the age of the property we would normally use a lime putty pointing mix, as this will allow more evaporation than a cement based one, or an NHL lime based products. Sometimes its also necessary as a minimum to remove any modern masonry paint at the base of the wall also, as this will increase evaporation also.
If you need any advice drop us an email, or phone the office please.
Please click the on the video below of me explaining about how to lower high ground levels, to try and control rising damp issues.