This example from a damp survey and investigation, where the repairs were carried out by Complete Preservation. You can see where I take you through my thought process of the issues, along with why I can justify the repairs needed. Traditional lime based materials will promote evaporation, and help to control rising damp issues. Unfortunately it isn’t unusual for somebody to have had a go before. If you need sympathetic rising damp solutions to include lowering high ground levels, removal of modern materials, and replacement with lime render and lime plastering, lime pointing, and modern paint removal this is the service we can carry out. We can also carry out CCTV drain surveys, drain lining, drain patching and all associated building repairs.
There will always be conflicting advice with repairing a traditional building. Fortunately the agreed joint damp methodology by RICS, Historic England, PCA, SPAB will be published very shortly, and I can only hope this sort some of this out. The new joint draft methodology – Investigation of moisture and it’s effects in traditional buildings joint damp methodology is explained here https://www.completepreservation.co.u…
Investigation of moisture and it’s effects in traditional buildings – RICS joint damp methodology. Sympathetic damp solutions to traditional buildings using lime based materials to promote evaporation. From CCTV drain survey, lime rendering, lime pointing, and modern paint removal
Damp investigations and advice will massively vary with what a client will get. This is simply because some damp investigations will not be thorough enough, and will be non invasive / non intrusive. Also it isn’t unusual to get different opinions on how to fix the issues. This is where it can get difficult especially if no data has been produced by taking plaster samples, as per BRE DIGEST 245 https://www.completepreservation.co.uk/what-is-bre-digest-245/ This then results on diagnosis confirmed just by an opinion, not by data…..If you need a damp survey that is based on opening up, data by sampling, to include drains surveys etc, please contact the office on enquiries@completepreservation.co.uk
RICS Joint Damp methodology Investigation of moisture and it’s effects in traditional buildings joint damp methodology
RICS JOINT DAMP METHODOLOGY,
Investigation of moisture and it’s effects in traditional buildings joint damp methodology, BRE DIGEST 245, BRE DG 245
Whilst this is still the draft methodology the new methodology will be published very shortly.
Do you know the questions you need to ask prior to instructing a damp specialist surveyor? This video explains and tells you the very basics that includes the facts from the British Standards
Bridged damp proof course or a bridged dpc (it’s also known as). How to repair a bridged damp proof course is only known once an invasive damp survey has been carried out. There can be many reasons why you have damp issues when a physical damp proof course has been installed, as per the diagrams in the video
Bridging of the damp proof course, or bridging of the dpc, is such a common cause of rising damp to internal walls, and also external walls. BS 6576, and BRE DIGEST 245 is the standards that all damp surveyors should be following. As per the video you need to ask your damp surveyor some vital questions. If you don’t ask these questions you might fall into the trap, and perhaps your root cause of rising damp will not be diagnosed correctly, that could result in expensive treatment and repairs. By getting the correct survey initially, it will add value long term.
1. First of all you need to make sure your damp surveyor is suitably experienced, and qualified.
2. You must ask for an invasive / intrusive survey if it’s anything to do with damp at the base of the wall, and possibly bridging of the dpc, like rising damp. Non invasive surveys will simply not be good enough.
3. An averagely competent surveyor will follow the guidance in BS 6576, as per what I have spoke about in the video.
4. They will also need to follow the methodology in BRE DIGEST 245. This is basically the only quantitative methodology to confirm rising damp, by using a carbide meter / speedy meter or better still gravimetrics.
5. Make sure all of the below are eliminated as a potential cause by your damp surveyor, as per guidance in BS 6576.
1. Condensation
2. Lateral penetration associated with ground and floor level
3. Leaks from roofs gutters, and downpipes
4. Faulty drains
5. Internal plumbing leaks
6. Water penetration through external walls
7. Water penetration around windows and doors
8. Mortar droppings in the cavity
9. History of flooding
I do find that if a physical damp proof course is present and there is damp on internal walls, there is a high possibility there could be drain issues, or a possible leak.
This property has been suffering from damp issues for a number of years, and it hasn’t been diagnosed correctly. I was told there were a few suggestions as of why it was thought to be damp, but we have found the cause now. Before you even think about damp proofing a building, it is about elimination before coming to a conclusion. I’ve seen many a times when a damp survey Company have carried out a damp survey, and haven’t eliminated anything in regards to potential causes of rising damp. In this case, this is a classic example of an obvious cause of rising damp, but unfortunately for some people who have paid for a damp survey there is no drain inspection carried out. Now i’m not saying that every property should have a drain survey, but there is British Standards in regards to damp surveys that actually mention this, especially if you have damp internally adjacent a drain. See below from British Standard BS 6576 4.2.1.3 d)
So the question is why doesn’t this get inspected? In my opinion if you ask any surveyor whether the firm is independent or not they will probably not offer a drain survey as this isn’t a piece of equipment they actually have. So it’s unlikely at enquiry stage they would want to lose out on a survey. To be fair though, any prior conversation the surveyor might have had with the client, they might think that from your observations the damp might be more condensation related, and this is reasonable. A decent CCTV drain inspection camera will cost around £5000.00 / £6000.00, plus you will need jetting equipment, and cleaning equipment along with sonde detection. All of this is likely to cost around £15000.00, plus a van to carry it in. You can now see exactly why a general surveyor wouldn’t offer this service.
We have heavily invested in our surveying equipment to ensure we get the diagnosis right first time. If you need a CCTV drain survey along with quantitative moisture analysis following BRE DIGEST 245, please contact us to discuss your issues.
The video below shows the cause of the rising damp. This was caused when the tarmac path was installed over 30 years ago, and damaged the drains.
It is presumed by the way of the self proclaimed damp experts that the calcium carbide meter, or also referred to as the speedy meter, is in fact the most reliable form of moisture measurement when it comes to identification of rising damp. Unfortunately most don’t really understand the limitations of the damp measuring instruments, and don’t follow the guidance as per BRE DG245, where part of the sample should be put aside for the hygroscopicity determination.
I own, and have used a calcium carbide meter on many occasions, and in my opinion when measuring moisture, when there is the potential for rising damp and hygroscopic salts this instrument can be massively misleading. I personally only use this when inspecting flood damaged buildings that are more of a modern construction that would unlikely to be contaminated from hygroscopic salts, from a genuine long term rising damp. The reason for this is because you can’t determine what is actually going on regarding the amount of moisture, and giving the correct advice to fix the issues.
Example explanations
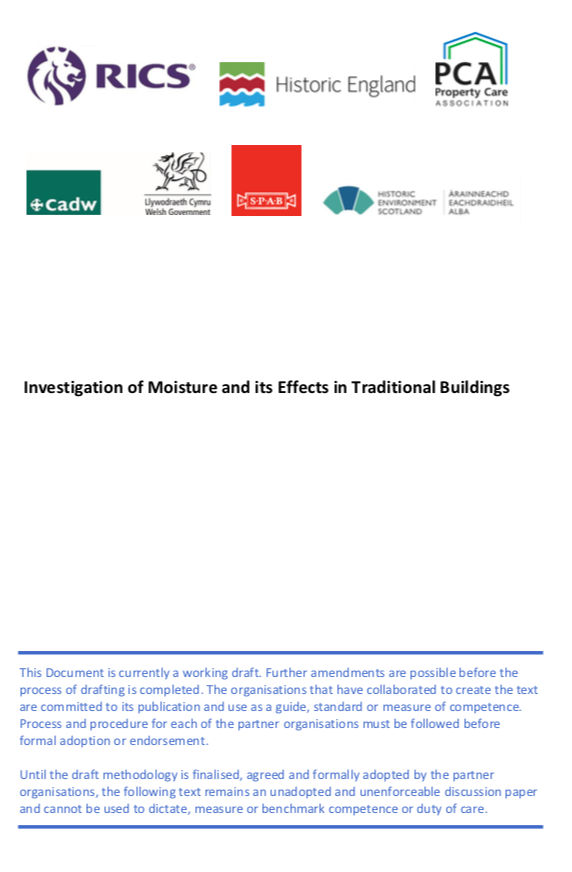
The below picture shows the total moisture content of a calcium carbide meter reading of a sample removed from the wall, and placed inside the speedy meter. As you can see it gives a total moisture content of 16 %. The total moisture content (16 %), is made up of the capillary moisture, and the hygroscopic moisture. The speedy meter doesn’t give a figure for these separate amounts, which is the misleading part.
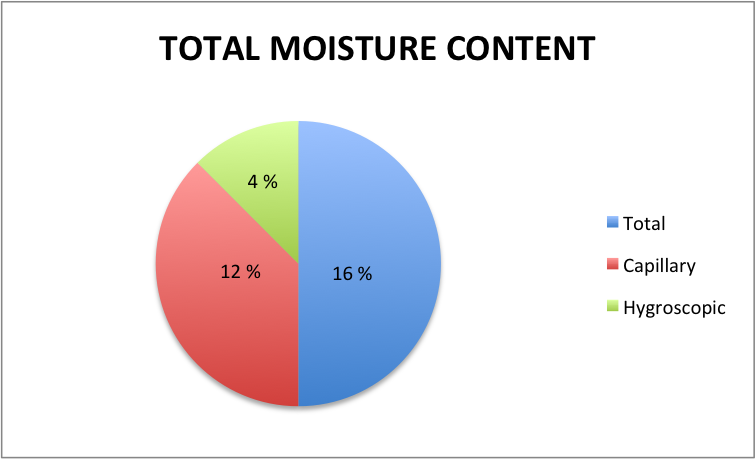
The below picture shows an example of the total moisture content broken down into the capillary moisture, and the hygroscopic moisture.
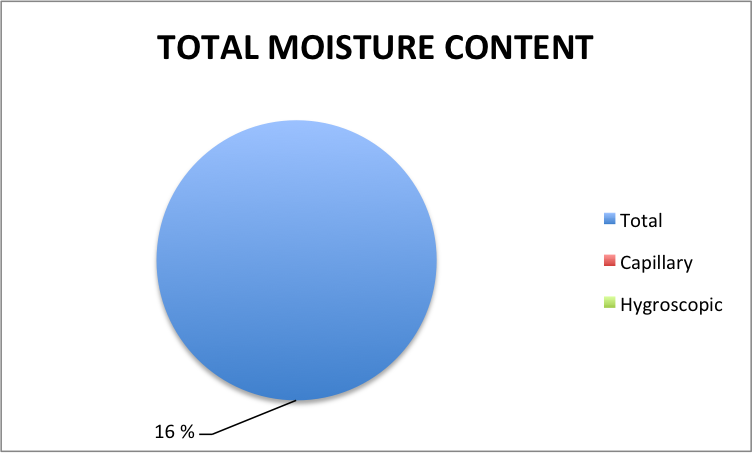
The below picture shows the same total moisture content as in the above picture, with a capillary moisture content of 1 %, and a hygroscopic moisture content of 15 %….. completely different.
The above images explain the total moisture content, and show that it is impossible for interpreting different moisture content results, without understanding the capillary moisture content, and hygroscopic moisture content on site.
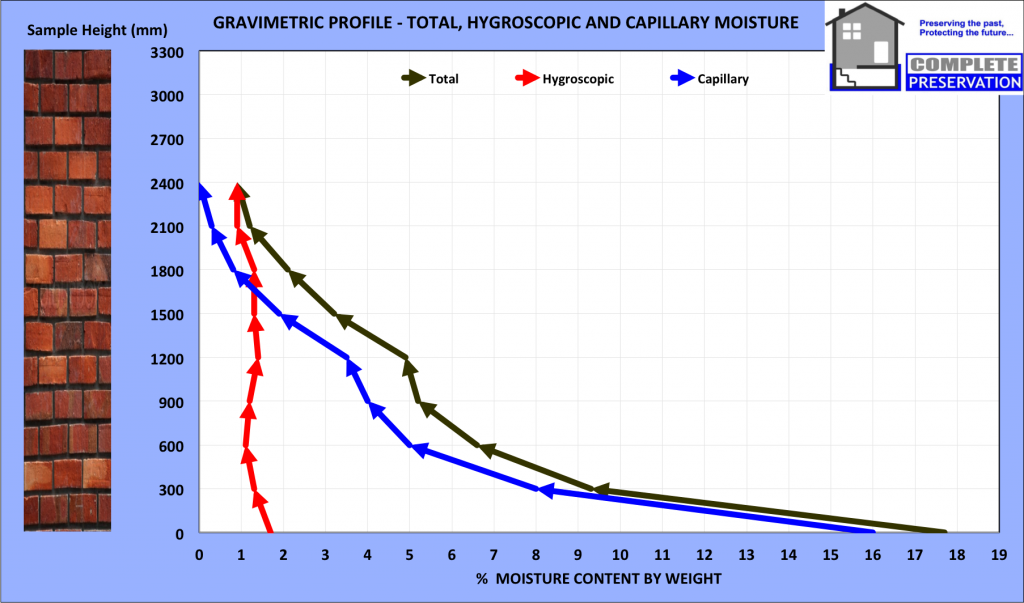
Lets now look at another example with some more guidance of why it is so important to differentiate between capillary moisture and hygroscopic moisture. This is from one of my recent surveys where a traditional solid wall property with no physical damp proof course installed has been damp proofed because it was presumed the property had genuine rising damp and needed a new damp proof course. During this survey I removed samples of plaster/mortar for analysis, and worked out the exact amounts of moisture using the gravimetric laboratory methodology. You can see in my graph below the total moisture content has been split up, to include the capillary and hygroscopic moisture content.
What does this graph show? This is the most important part…. what it shows here, is that there is a very high amount of capillary moisture content, and a low level of hygroscopic moisture content. This is not what you would see on a genuine long term rising damp issue, as you would normally see more of a distinguished hygroscopic salt band. This property actually had issues with drains that I picked up with our CCTV drain survey. The samples were also chemically tested for nitrates and chlorides (hygroscopic salts), and none of any significance were present. All of the data points to drainage issues or possible leaks, and this couldn’t be observed from an onsite calcium carbide meter test. This property needs to be dried down with a Corroventa desiccant tented drying equipment, and the drain issues rectified.
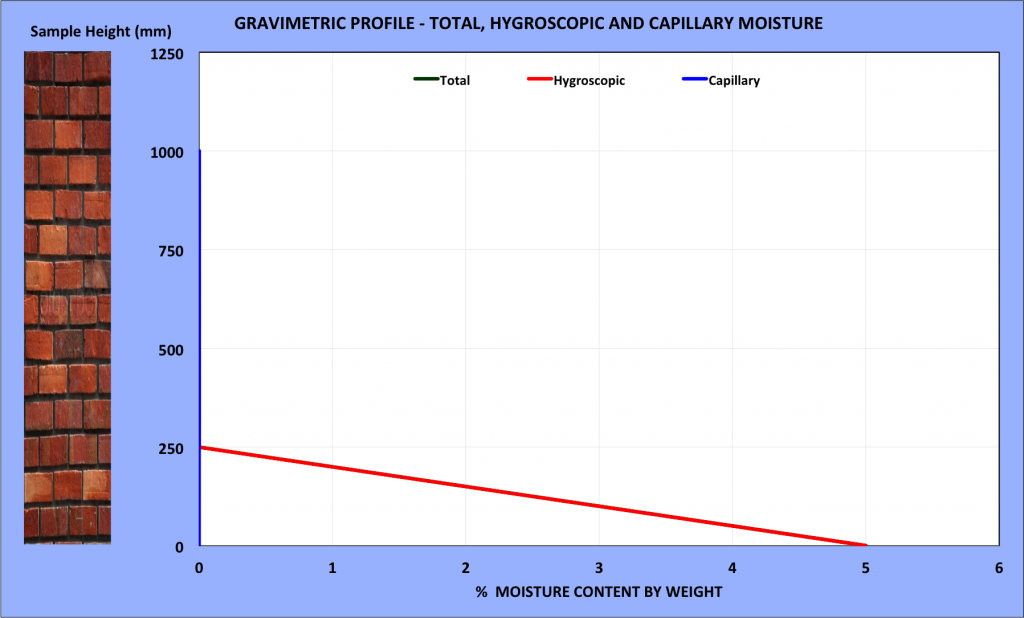
The below graph is something I see often where a physical damp proof course has been installed from new when a property was originally built. The total moisture content is 5%, and so is the hygroscopic moisture content, and the capillary moisture content is 0 %. How could you give suitable advice to your client if you couldn’t differentiate these moisture contents?
What this actually shows is that there is no capillary moisture. Capillary moisture content, is only present if there is a source of water/free moisture such as rising dampness. The amount of capillary moisture content will depend on the permeability, porosity and severity of the water ingress. The absence of capillary moisture indicates that a material is ‘dry’, that is not subject to water ingress from any source. This means normally that the damp proof course is most likely to be bridged, by plaster, debris in the cavity, or perhaps the floor screed. By also chemically testing the mortar samples for nitrates and chlorides, we can prove if these are present. If these are present as in this case, the repair was to remove the bridging issue, along with a suitable plaster repair.
Capillary moisture /Free moisture
The second component is the free moisture content which is only present if there is a source of water ingress such as rain penetration, rising dampness. The amount of free moisture will depend on the permeability, porosity and severity of the water ingress. The absence of free moisture indicates that a material is ‘dry’, that is not subject to water ingress from any source.
Ground water salts: Not only is the distribution of moisture required, we also need to obtain details of past activity of rising dampness, and this can be obtained from the presence and distribution of ground water salts, basically chlorides and nitrates. Where a long term rising damp complex has existed, these salts will always mark the maximum height to which water has risen, and tend to form a concentration (‘salt band’) around the maximum height of rise. I often find on very old properties that have been subjected to long term rising damp over many years, sometimes two distinguished salt bands. Thus, even if water ceases to rise the salts will still remain and ‘mark’ the maximum height once reached. It is the relationship between the distribution of moisture and salts that is the basis of the investigation.
The information regarding speedy meter testing of moisture and gravimetrics has been published and documented by Building Research Establishment (BRE) for many years. The earliest copy I have is the TIL 29 version which was revised in April 1977, and the latest version is BRE DIGEST 245, also known as BRE DG 245. The latest version of this document is from 2007.
Very important extract below from DG 245 2007 edition
Experience has shown that some building materials possess an HMC of up to 5% even without the introduction of salts from external sources. Although only a rough indicator, the 5% threshold does represent a reasonable general guide to whether or not some kind of remedial treatment is needed. This emphasises the importance of the difference between the HMC and MC measured on samples. It can also be useful to establish the MC and HMC of wallpaper, plaster and render, although drying plaster above 35 °C will drive off hydration water bound within the plaster and must be avoided. The figure of 5% at the base of the wall (the wall/floor junction) can be taken as an approximate guide to the presence of rising damp. However, even at this low level of moisture there can be a risk of damage to finishes and rot to any timber that may be in contact with the wall.
If you like this kind of geeky facts on damp, you might like this one that has some screen shots from the British Standards www.completepreservation.co.uk/rising-damp/http://www.completepreservation.co.uk/rising-damp/
Easy damp survey today. After having previous damp repairs carried out to their property that have subsequently failed, they decided to try and find a damp specialist surveyor that actually wants to eliminate issues before coming to a conclusion of why there is a damp problem.
In this instance the previous surveys, and works were more of a quote to repair a visual damp issue. Unfortunately no drains were tested or leak detection tests were carried out, so the same conclusion was given, and that was to install a dpc (damp proof course).
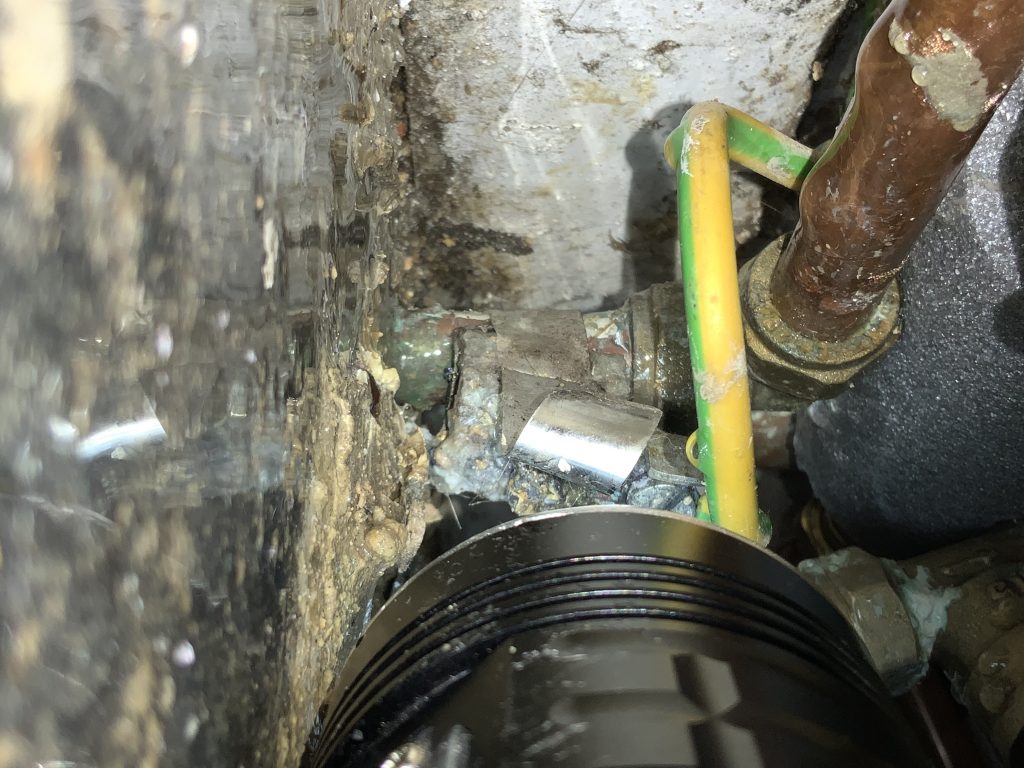
I tend to find there can also be at least a couple of things that always need to be rectified, but in this instance there was one issue. Because the cupboard was full to the brim the previous damp specialists failed to inspect inside the cupboard where the rising water main was. There was a small leak on this, but it wasn’t visible in the cupboard because of the vinyl floor covering. I also did drill a full gravimetric profile just to prove if there were no hygroscopic salts present, which would be indicative of long term genuine rising damp issues.
leaking mains water pipe
Top tip
Expect to pay for a damp survey, and expect to have an invasive survey where plaster samples are removed from the wall, and tested following the methodology in BRE DIGEST 245. It’s always prudent to have a drain CCTV survey to check for any defective drain issues, and even possibly a leaking mains water pipe.
If you need a damp survey where you want to be sure all issues are eliminated, to offer a long term solution give us a shout 🙂
I was recently asked to survey a property that had visible damp issues internally.
I was informed that a ‘damp specialist’ had already visited the property, and had diagnosed rising damp issues, and subsequently recommended a chemical damp proof course has to be installed to fix the rising damp issues. This was carried out around 3 months prior to my survey.
The property is a 1970’s 2 bedroom ground floor flat, this being cavity construction along with a physical damp proof course installed from new.
Any survey starts with the basics like the reported history, the tenant/homeowner that lives in the property can give you so much info that can help with the diagostics especially if it’s only a snap shot survey.
There is often lots of controversy regarding damp meters, these are an excellent tool when used appropriately-there often not though. The pattern of readings I found on the wall when profiling from floor to ceiling didn’t replicate any form of a rising damp profile.
Observations
I noted visible dampness when a bed was pulled out from the wall, mould was noted on the bed, small amounts of condensation on the windows. A very small amount of condensation at the base of the bedroom external walls, mostly behind furniture.
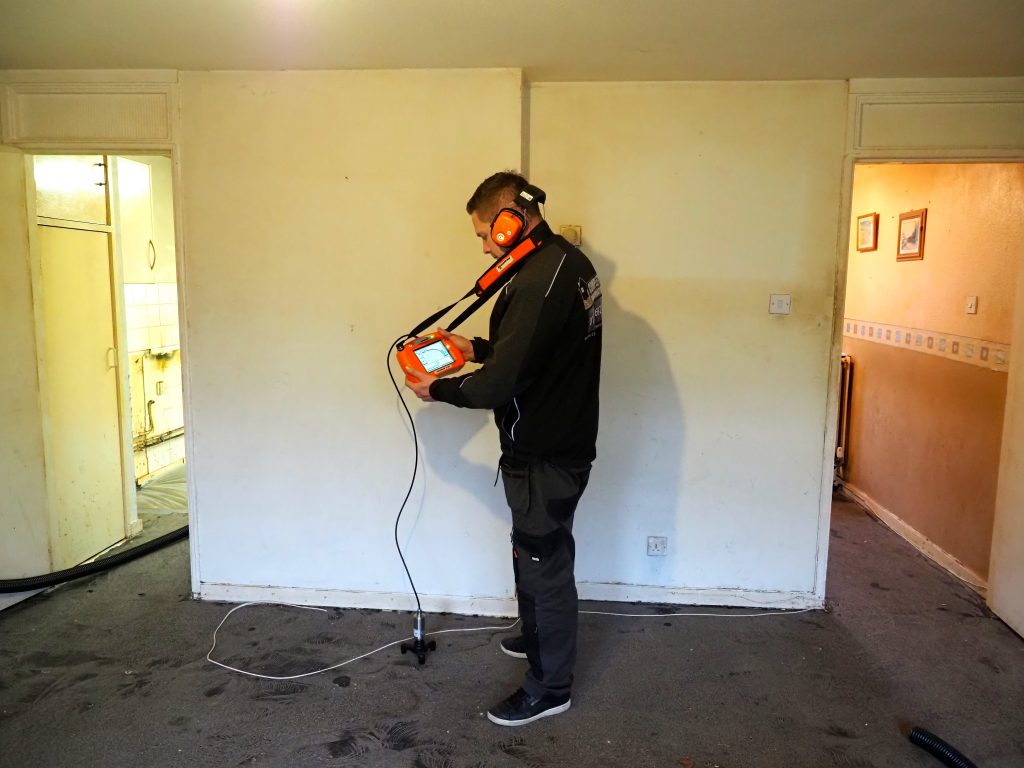
When carrying out surveys I find my Flir T600 gives a great understanding of the building fabric, especially during snap shot surveys. I use this meter linked to a Flir MR77, to produce an isotherm. An isotherm is basically a blue colour on the screen that shows everything at dew point (condensation occurring). What I can also do is change the temperature up or down to find at risk areas, and check these areas with moisture meters etc for patterns of dampness.
Below shows a visual of the dampness to the wall, possibly a tide mark from rising damp or something else.
The below shows mould growth on the wall, mould will not occur on the wall if there has been a long term rising dampness problem with subsequent salts.
The below shows the paper was easily peeled back with no damage. Sample pots along with a slow speed drill are being used to collect plaster samples to see if there is any free moisture in the wall (behind the surface-about 20mm in). I follow the methodology in BRE Digest 245 for quantitative results.
This is as simple as it gets, and for some reason lots of surveyors never carry out this very basic procedure. We know there is dampness to the surface of the wall, possibly condensation, now after I have drilled out a small sample, I then check the wall with an insulated deep wall probe-this shows if the dampness is at the surface or in the wall is dry. We now know that in the wall is dry, and the surface is damp, we can now carry out profiling up the wall every just to see if there is a pattern to the dampness issue or another possible issue.
Green indicates a dry reading.
Dry.
You can see the holes where I have taken the samples
Holes filled no visible damage from my destructive survey, the paper was put back into place – happy days.
Externally I noted the walls have had retro-fit cavity wall insulation, the visible chemical damp proof course drilled, and some blocked drains.
Click the link to the below video to see what I could see during my inspection.
One thing that concerned me the most was that the damp proofing technician actually drilled the damp proof course through the physical damp proof course!!! Not only that the pointing looked like he applied neat cement with the palm of his hand to cover the injection hole…….not even the slightest attempt to blend in with the original mortar, like he wanted everybody to see his first class bodge up!
Blocked cavity.
Chemical damp proof course drilled through physical damp proof course.
The chemical damp proof course from another angle.
No comment!
This issue was a condensation problem, nothing to do with rising damp, and the damp proof course that was drilled into the outer skin only was a complete waste of time.
I know I take longer to do my surveys than some of the other local damp specialists, but I think I offer value for money 🙂
Have you got a damp problem that you can’t figure out? I find many people don’t even consider a leaking pipe buried within a solid floor. Most people are under the assumption that the alleged damp is just simply rising damp. I have also found that home owners have had a number of free surveys and are convinced they actually need a new chemical damp proof course. It’s not until naive people have spent several thousands of pounds on damp proofing that they they contact us to help them out, as they still have a problem.
Locating Water Leaks using advanced electroacoustic ground mics
When a pressurised water pipe leaks the water flows out which causes the pipe and surrounding material (mud, concrete tarmac) to vibrate. This sound, or vibration, is transmitted along the pipe (structure borne water leak noise) and through the surrounding material (ground borne water leak noise).
With the Aquaphon A200 ground mic set listening for these water leak noises is now easier than ever before.
If you have a possible leak and need some help give us a shout…..